
Editor’s Note: Welcome to the fourth and final Practice Checkpoint in Understanding and Preventing Entra ID Agent Identity Attacks: A Comprehensive Guide. Throughout the series, use these short, hands-on, mini-walkthroughs to explore the objects and behaviors we have discussed. To review previous chapters and practice lessons, start here.
In Chapter 5 of our guide, you learned about and practiced using Microsoft’s Agent Registry and walked through the operations of three agent identity authentication flows in Entra ID.
In this Practice Checkpoint, we’ll verify the three flows we discussed by following each one end-to-end through Microsoft Graph and showing the actual token claims in each step to connect all the dots.
For consistency and clarity, we’ll continue using the same agent identity we created in the previous steps and inspect the resulting tokens produced in each flow.
Here’s a quick recap of the information you need:
- Blueprint ID = 3534ec06-21ea-4080-abd4-95116e260203
- Blueprint SP ID = 17a48807-f813-421b-85b9-8c7e794bc4b9
- Agent identity ID = b85d92be-fa90-486b-94ed-b5ad91d35ceb
- Agent user ID = 2954440b-1617-46b1-9156-dad15f1f824f
- Inheritable delegated permissions = Group.Read.All
- Direct app-only permissions at the agent identity level = User.Read.All
Autonomous flow
In this flow, the agent identity itself needs to access a resource.
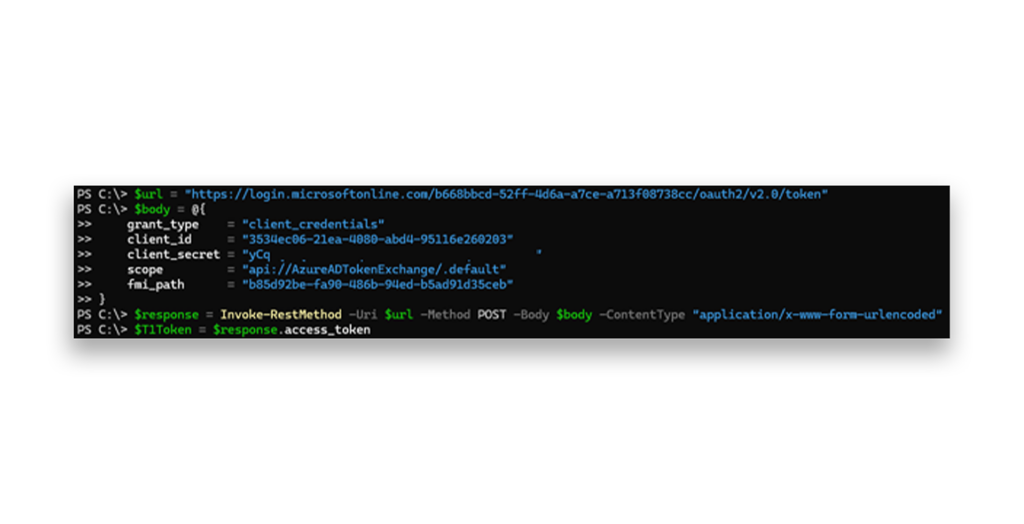
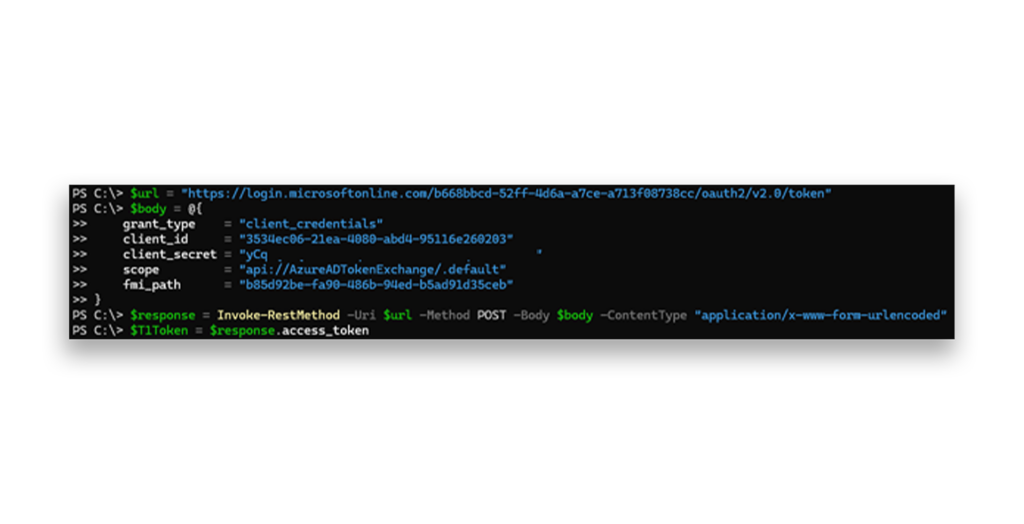
To begin, we need to obtain the T1 token. This is similar to obtaining an access token for an agent identity blueprint, but with two key differences:
- scope =
api://AzureADTokenExchange/.default - include fmi_path =
<agent-identity-id>
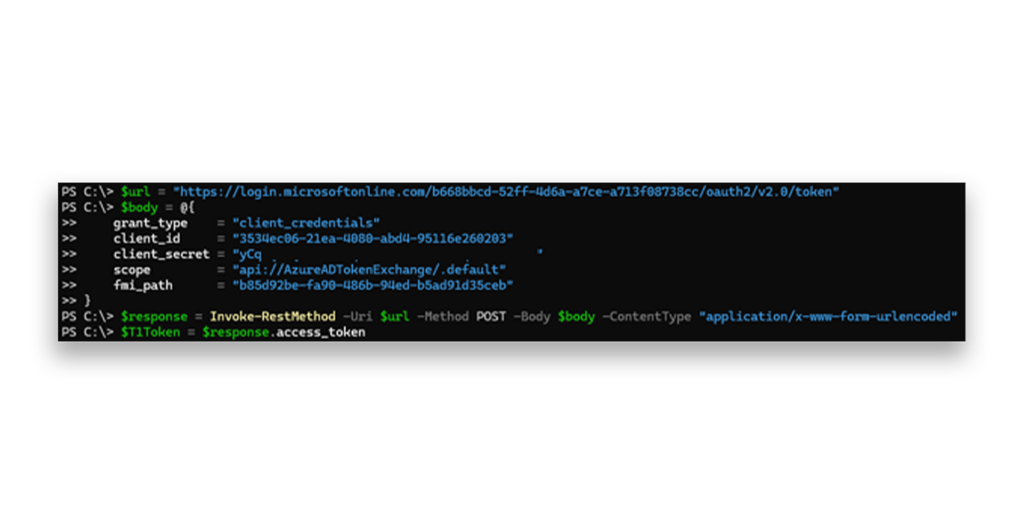
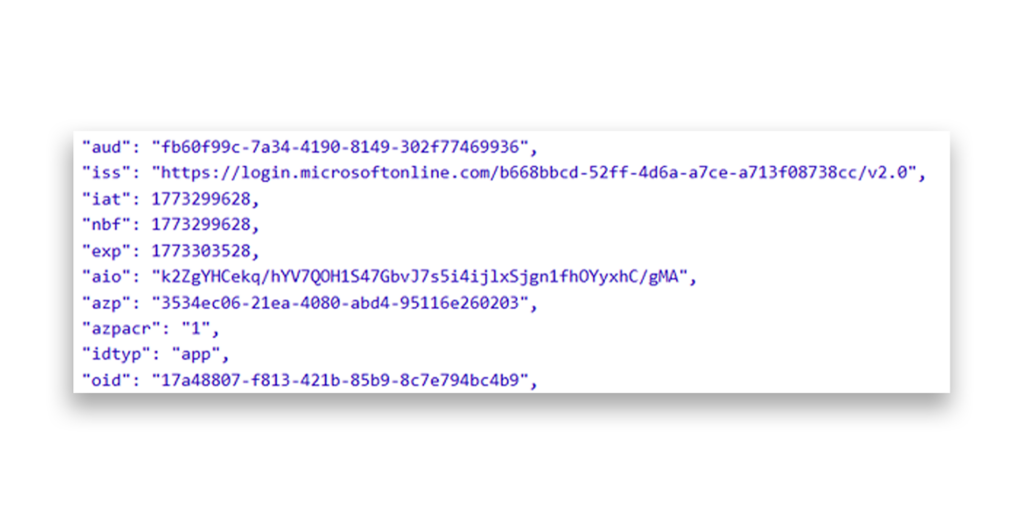
We can decode the T1 token, in which:
- oid maps to the blueprint SP ID.
- azp maps to the agent identity blueprint ID.
- aud belongs to AAD Token Exchange Endpoint application, which is
api://AzureADTokenExchange.
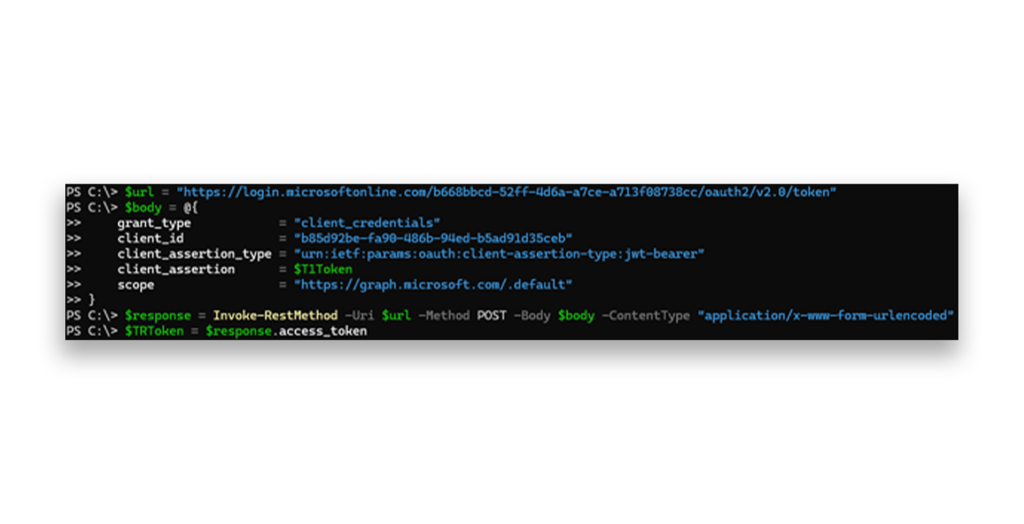
Using T1 token, we can now get the agent identity access token.
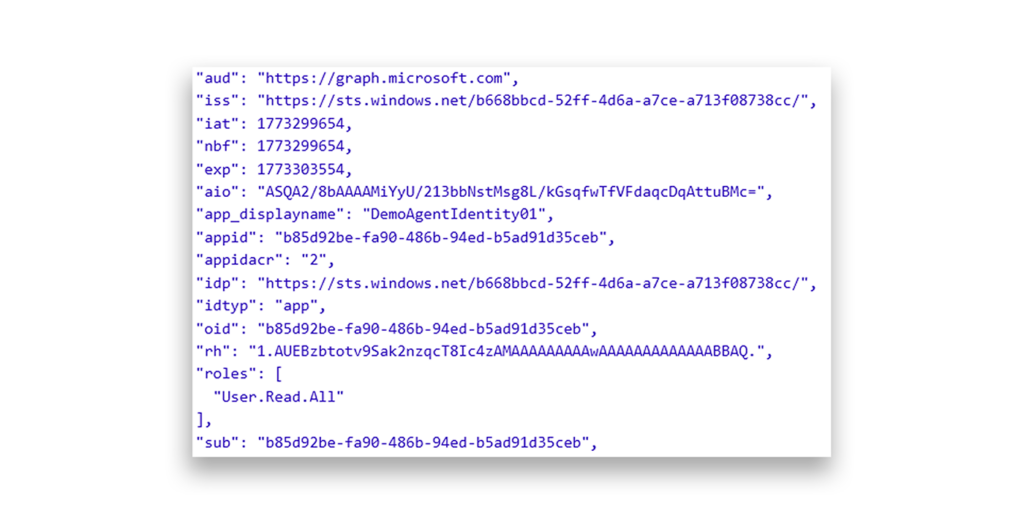
Looking at the Graph token we can find that:
- aud claim is Microsoft Graph.
- appid, as well as the oid claim, corresponds to the agent identity ID.
- The roles claim includes the
User.Read.Allpermission, which we assigned earlier and directly assigned to the agent identity as an app-only permission.
At this point, the agent identity can call Graph in the tenant according to its app-only permissions.
On-behalf-of flow
In this flow, the agent identity performs delegated actions as a user and demonstrates inheritable delegated scopes.
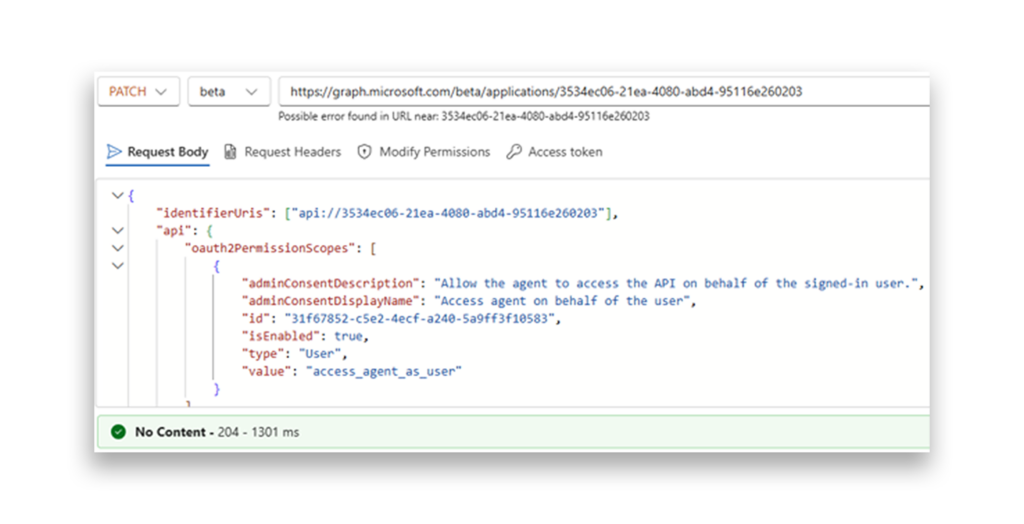
To start, we will need to get a client token (TC). To do so, we first need to set OAuth2 permission scopes on the blueprint and consent to it with my user.
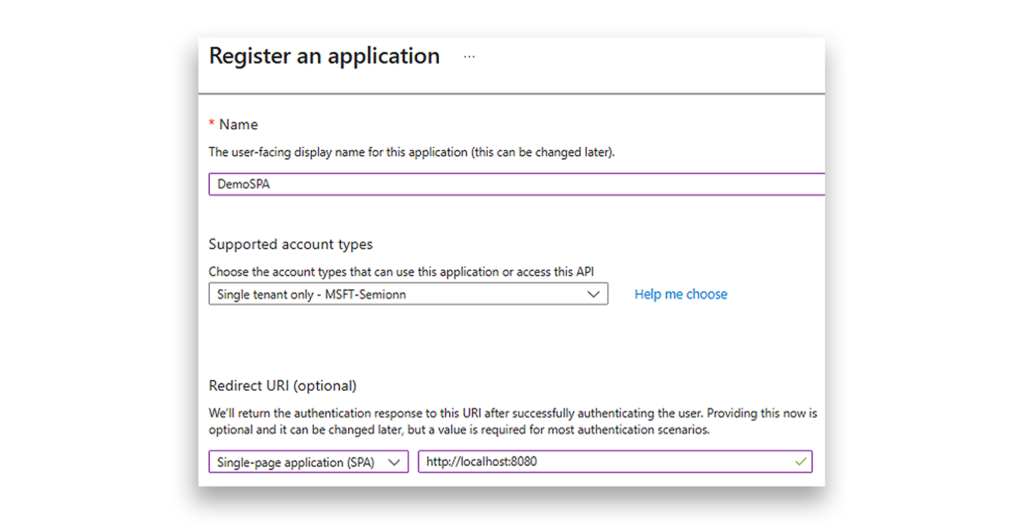
As a next step, we will create an SAP application via the UI.
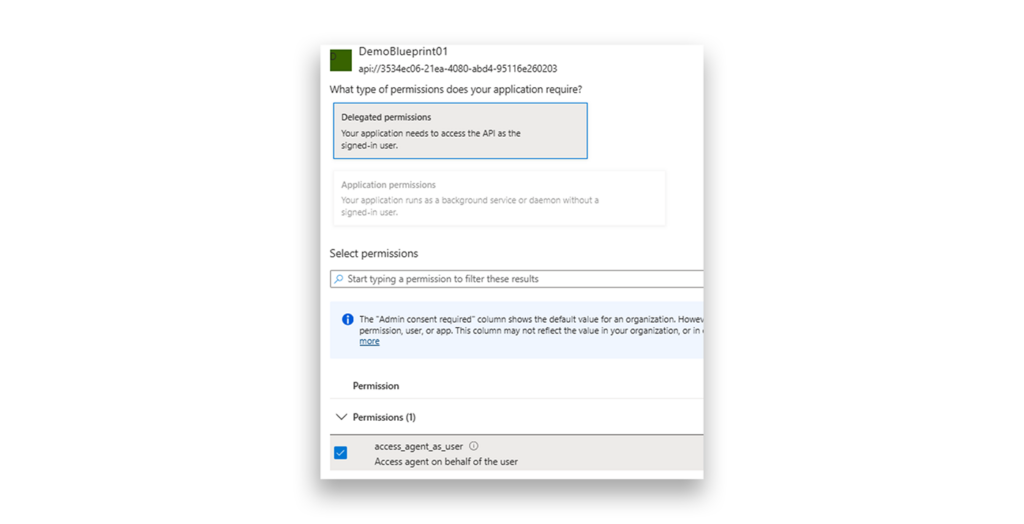
We will add the Blueprint permissions we just created to our DemoSAP application:
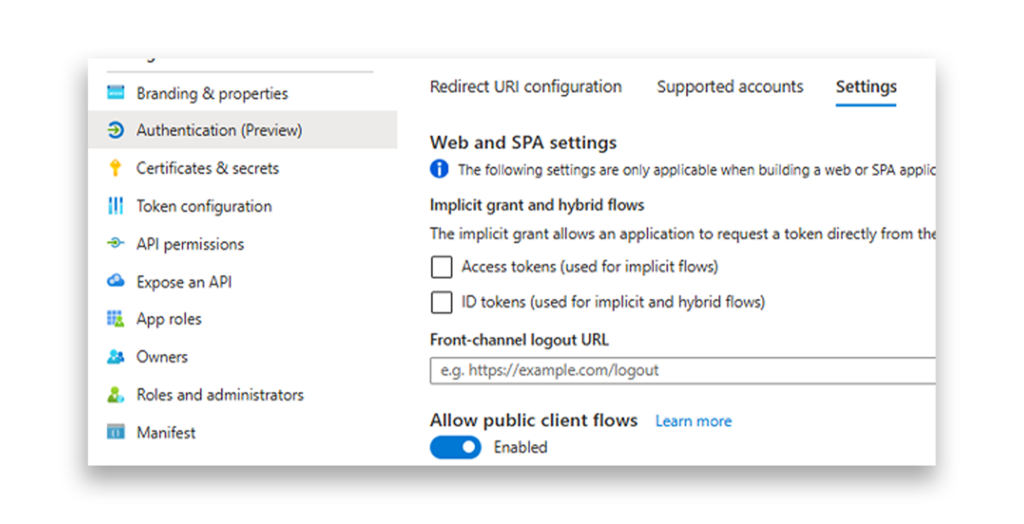
For this demo, we will also allow the public client flow:
Now we can obtain a TC token. The ClientID is the application ID we just created:
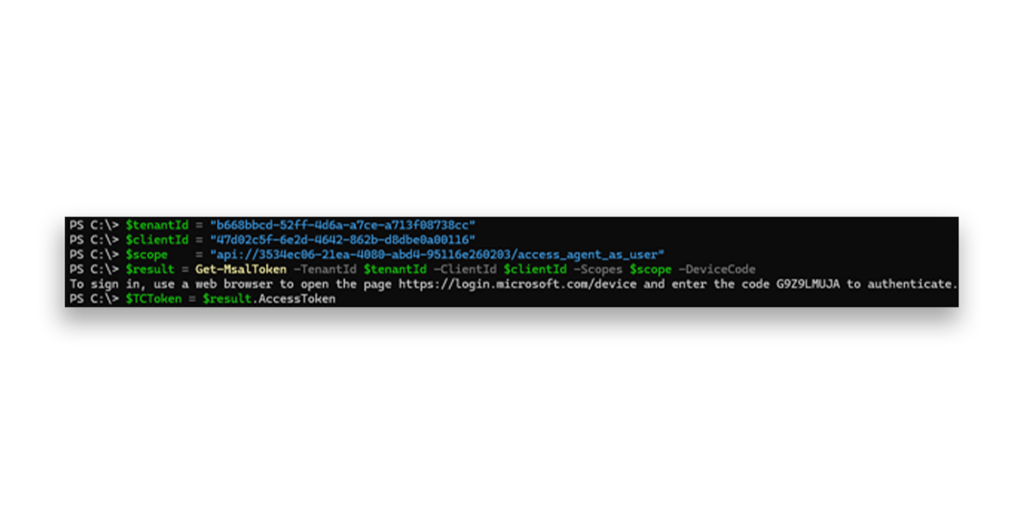
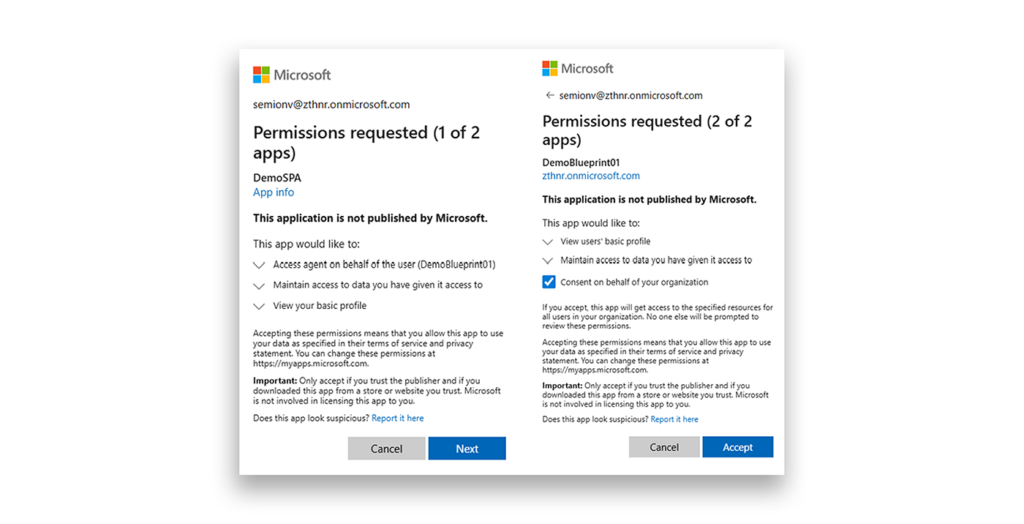
Next, we need to go through the expected regular consent prompts.
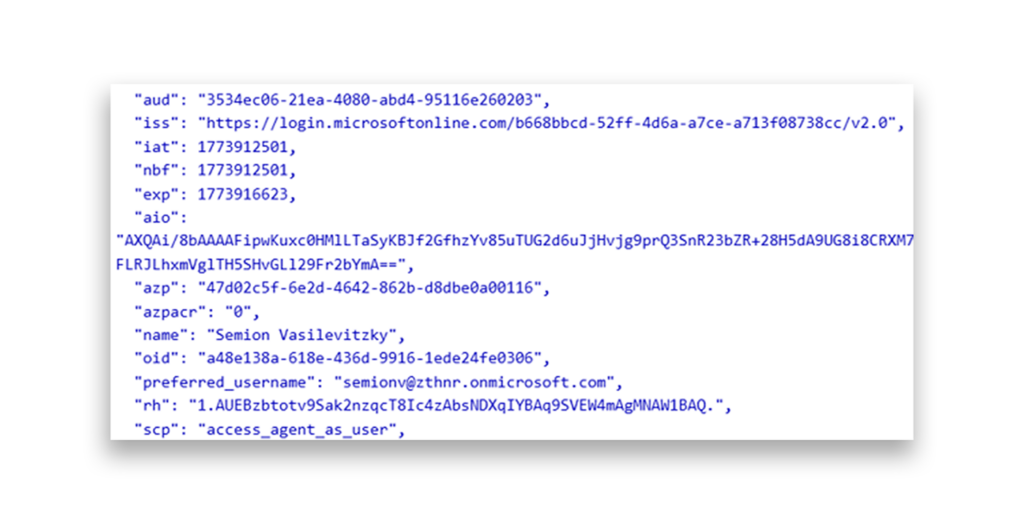
This will return the TC token, which belongs to me as a user. We can see the aud claim is the Blueprint ID:
Now we can get the T1 token using the same method we already used.
Before we continue, we would need to give consent so the agent identity can act on behalf of our user using a standard OAuth2PermissionGrants call with the scope we assigned as inheritable permissions.
If you already consented to AllPrincipals under the Configuring inheritable permissions section in Practice Checkpoint 2, you can skip this call.
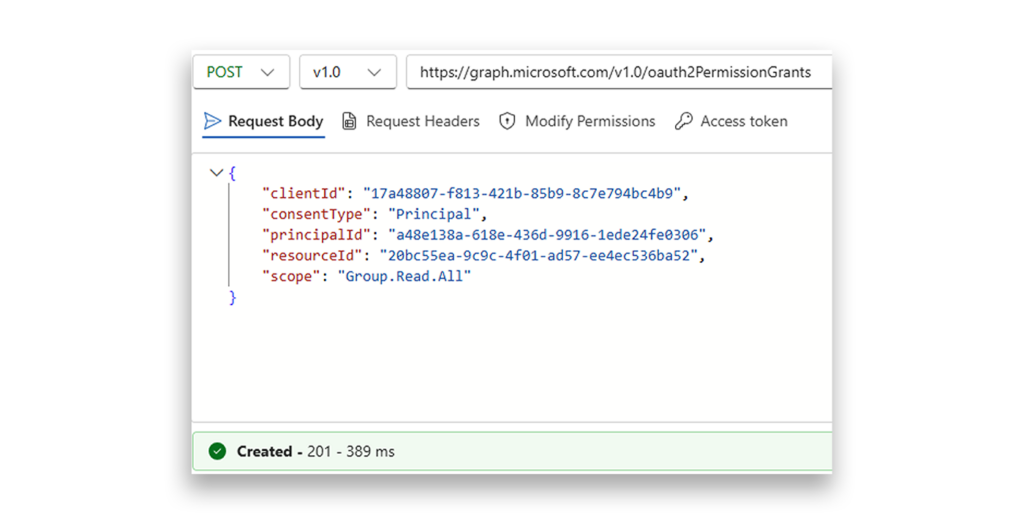
Finally, using both TC and T1 tokens, we can get the access token (TR).
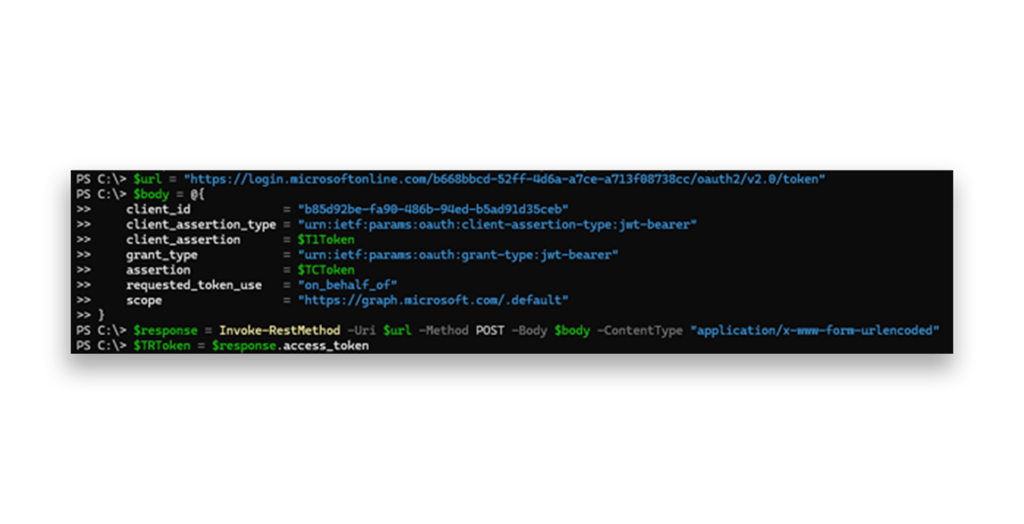
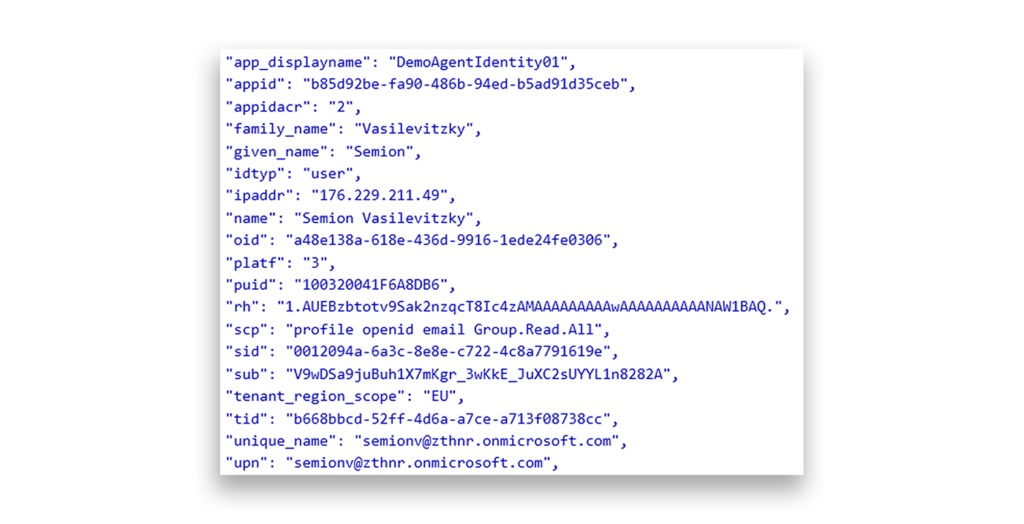
The decoded access token shows:
- scp claim with the inheritable Group.Read.All permissions that we added at the blueprint level earlier.
- app display name and the appid claim, which identify the agent identity that is operating on behalf of the user.
- idtyp, name, and oid claims all belong to the user (because it is a delegated token).
Agent user flow
This flow is relevant for an agent user who needs to perform actions with a user context.
As with the agent-identity autonomous flow, we need to obtain a T1 token.
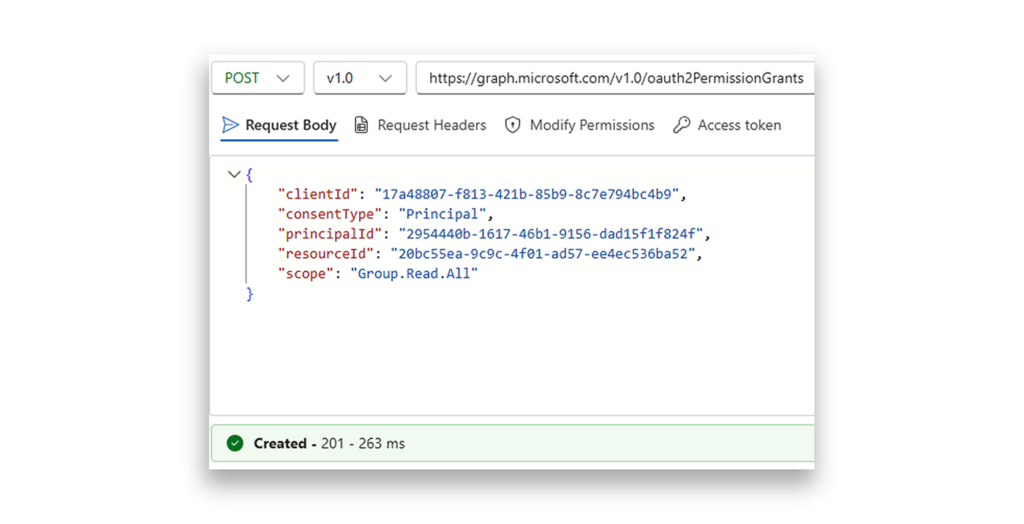
Next, we would need to consent to allow the agent identity to act on behalf of the agent user, as we did in the OBO flow.
This time, we will specify the agent user ID as the principal ID. If you already consented to AllPrincipals under the Configuring inheritable permissions section in Practice Checkpoint 2, you can skip this call.
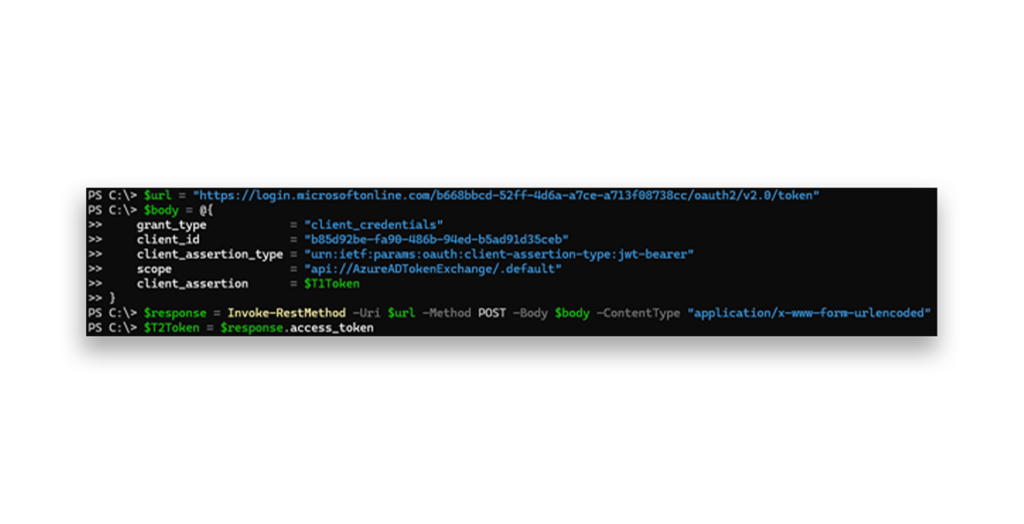
Now, using the T1 token we can obtain the T2 token.
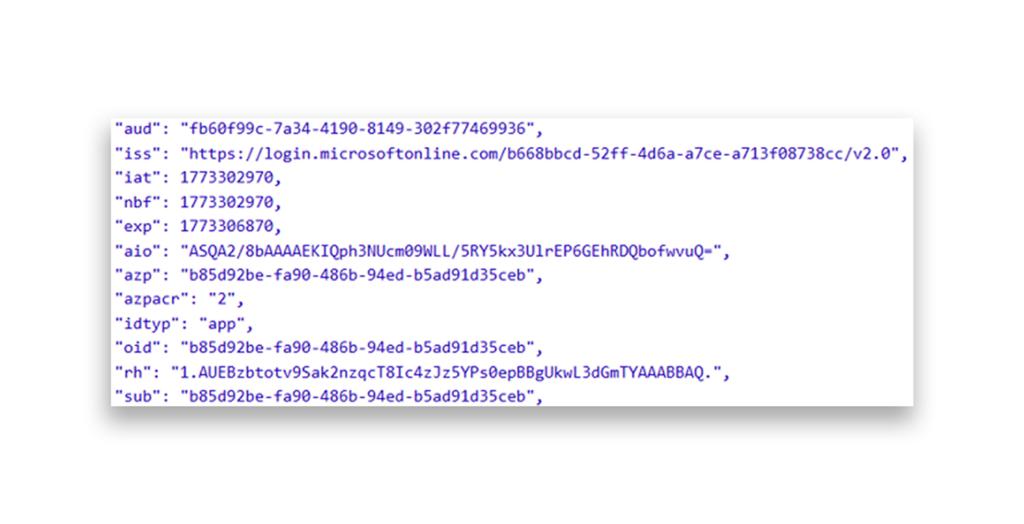
The decoded T2 token reveals the azp, oid, and sub claims, all set to the agent identity ID.
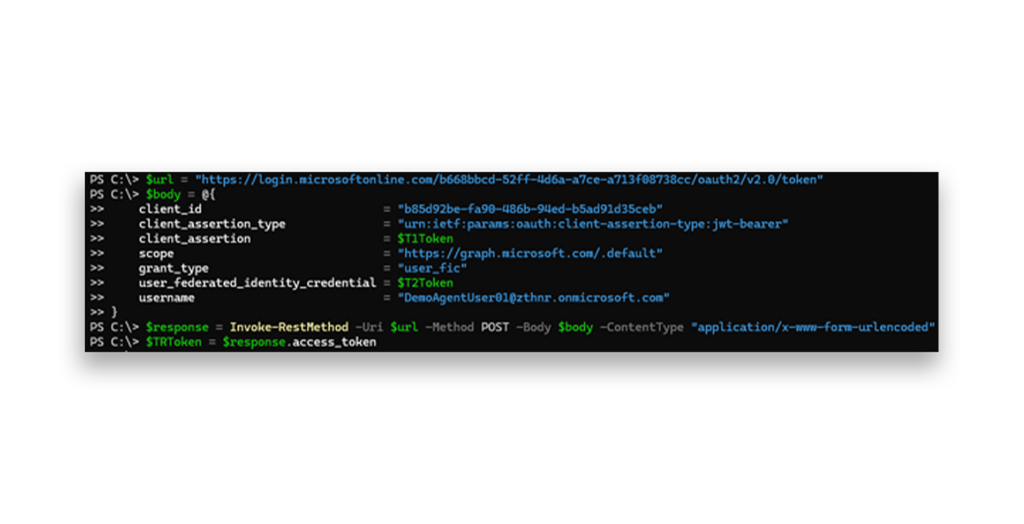
Using both T1 and T2 tokens, we can get the TR access token.
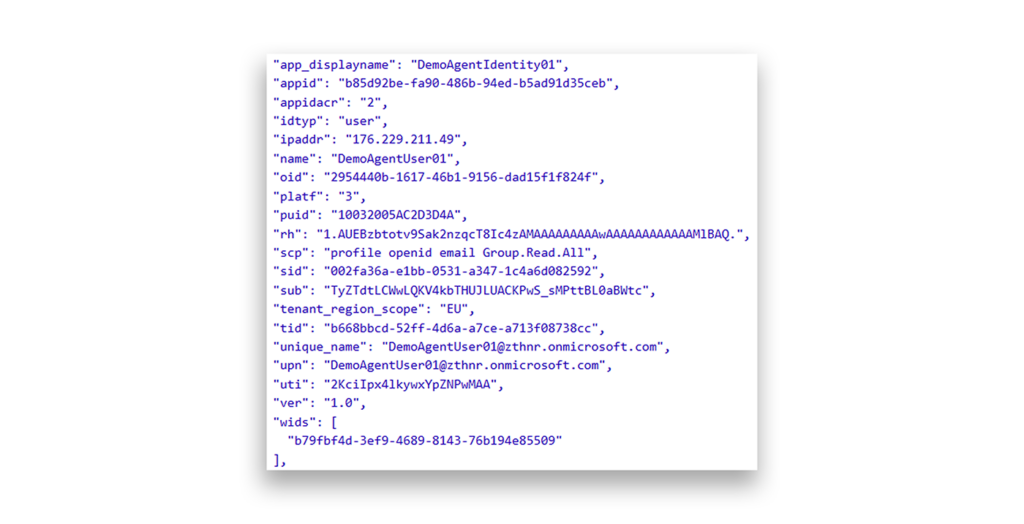
As we can see, this access token was issued for Microsoft Graph. It shows:
- idtyp claim is a user
- oid claim corresponds to the agent user ID
- appid is set to the agent identity ID, which is the parent of the agent user.
- scp contains the
Group.Read.All, the scopes that we added earlier.
Now you have a working agent identity. How do you protect it?
Building your agent identity through these practice sessions should have given you a practical understanding of how agents will be working in your Entra ID tenant.
Now, read the final chapter in our guide for an overview of what can go wrong—and how to protect these new identities.
Discover how to prevent disaster in Chapter 6.
Explore the guide
- Introduction: Understanding and Preventing Entra ID Agent Identity Attacks: A Comprehensive Guide
- Chapter 1: Meet Entra ID Agent Identities (BTW They’re Not People)
- Chapter 2: The Taxonomy of Workload Identities in Entra ID: Enterprise Applications, Service Principals, and Other Forms of Organized Confusion
- Chapter 3: Understanding Microsoft Agent ID and the Agent Identity Platform
- Practice Checkpoint 1: Building Agent ID with MS Graph
- Chapter 4: Agent Identities: Design Deep Dive
- Practice Checkpoint 2: Setting Agent Identity Permissions
- Chapter 5: The Agent Registry and How Agent Identities Operate in Entra ID
- Practice Checkpoint 3: Registering an Agent—With and Without Agent ID
- Chapter 6: Where Things Might Go Wrong with Agent Identities in Entra ID—and How to Prevent Disaster