
Editor’s Note: Welcome to Chapter 5 of Understanding and Preventing Entra ID Agent Identity Attacks: A Comprehensive Guide. To review previous chapters and practice lessons, start here.
While we were writing this blog, the registry blade was removed from the Entra portal. Now the registry is part of the Agent 365 admin center. Regardless of that change, it is still worth mentioning, as it is an important part of the agents' ecosystem in your organization.
What the Agent Registry is (it’s not the registry you’re thinking of)
The Microsoft Agent Registry is the centralized inventory and governance view for AI agents in the organization. In the current Microsoft model, this registry is surfaced primarily through Microsoft Agent 365 in the Microsoft 365 admin center, while Microsoft Entra Agent ID remains the identity and access layer for agents.
This distinction is important.
The registry answers questions such as:
- Which agents exist in the tenant?
- Who owns them?
- Where were they created?
- Are they published, shared, blocked, or available to users?
- What tools, data sources, risks, or configuration details are associated with them?
Microsoft Entra Agent ID answers a different set of questions:
- Which agents have first-class Entra identities?
- Which blueprint created them?
- What permissions do they have?
- Can Conditional Access, identity governance, and identity-related monitoring be applied to them?
Because the registry is an inventory and governance layer, it can include agents that do not have a Microsoft Entra Agent ID; in other words, they don’t have an Entra identity. Microsoft refers to these as registry-only agents. The registry allows administrators to get visibility into agents even when those agents are not represented as first-class Entra agent identities. We will see an actual example of that in the next practice checkpoint.
Agents created through supported Microsoft platforms, such as Copilot Studio, can appear automatically in the Agent 365 registry. Custom or external agents can be onboarded through supported Agent 365 or Microsoft Graph registration flows, depending on the platform and preview API support.
When we first began research on some of the aspects of Agent ID, the Entra Agent Registry preview described a lower-level model based on agent instances, agent card manifests, collections, and registry-specific roles. In that model, agent cards manifest described capabilities and skills, while collections control discovery boundaries for agent-to-agent communication. Those concepts are useful for understanding where Microsoft was heading at the time.
The current public Agent 365 documentation emphasizes a higher-level registry experience: tenant-wide inventory, lifecycle actions, publishing and availability, ownership, risk visibility, tools, and connected-agent management.
Therefore, the safest way to think about the current registry is this:
- Agent 365 is the place to discover, monitor, and govern agents across the tenant.
- Entra Agent ID is the place to manage the identities, permissions, and security controls of agents that have Entra-backed identities.
Agent card
An important component of an agent in the registry is the agent card, which holds the agent’s information for discovery, including skills, abilities, capabilities, and other manifest-defined details.
The agent card is the metadata document that describes an agent for discovery and integration. It tells other systems what the agent is, who provides it, where it can be reached, what protocols or interfaces it supports, what capabilities and skills it exposes, and what authentication requirements apply. This information is also relevant for agent-to-agent communication.
Registry capabilities
From the Microsoft 365 admin center, administrators can review agents, inspect ownership and platform details, control who can install or use an agent, install or uninstall agents, block or unblock agents, delete supported agent types, reassign ownership, approve or reject requested agents, pin important agents for users, review data or tools and security details, and manage connected agents or agent instances where supported.
These actions operate at the registry and Microsoft 365 experience layer. For example, blocking an agent in the registry prevents users from installing or using it in supported Microsoft 365 experiences. This is different from disabling an Entra Agent ID, which operates at the identity layer and affects authentication/token issuance for the underlying agent identity.
Blocking an Entra agent identity via the M365 admin center will disable the identity in the Entra portal as well, which will block access and token issuance. Unblocking it will enable the Entra identity. But the opposite is not true, if you disable an agent identity using the Entra admin center, the identity will still be available at the registry, which means you can try to use the agent, but when it comes to identity authentication, the process should fail.
You can find full documentation about the registry here.
To better understand how the registry works, walk through the steps in Practice Checkpoint 3: Registering an Agent.
Authentication Flows: Three Ways an Agent Gets the Work Done
Agent identities authenticate through one of three OAuth-based flows, each designed for a different operational scenario:
- Agent autonomous app OAuth flow: App-only protocol
- Agent OAuth flows: On-Behalf-Of flow
- Agent user impersonation protocol
These flows define how an agent obtains tokens, how permissions are applied, and how the blueprint, agent identity, and (when applicable) agent user participate in the process.
Regardless of the flow, the agent ultimately proves its identity to Entra ID using credentials configured on the agent identity blueprint, such as federated identity credentials, certificates, or client secrets.
Understanding how Agent ID authentication works in practice means going beyond the diagrams and following each flow end to end: who is authenticating, which tokens are issued, what each token is for, and where the resulting permissions actually come from. With that in mind, let’s map the three authentication flows side by side and bring some structure to what can otherwise feel like a noisy token-exchange maze.
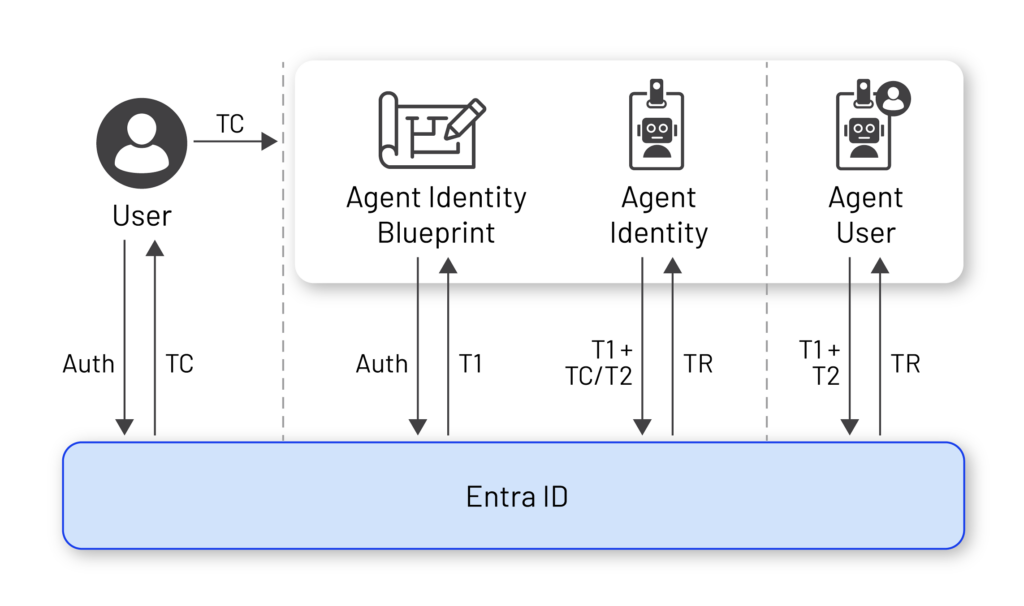
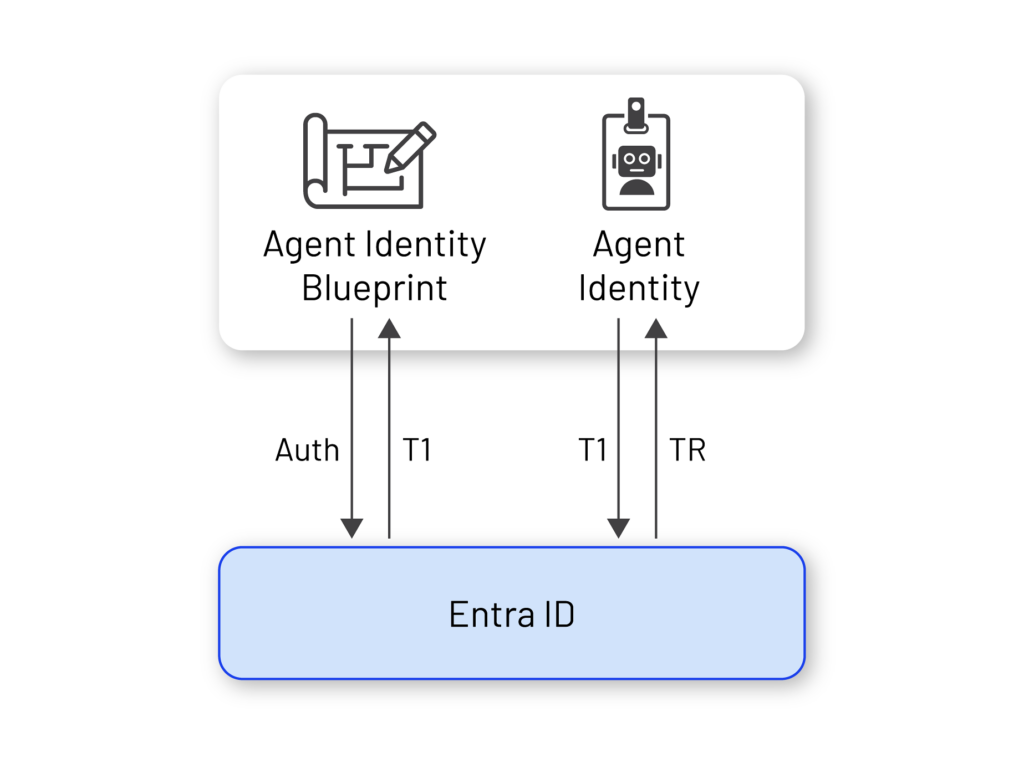
Autonomous authentication
An autonomous flow is an app-only flow with no user context in which the agent identity wants to access a resource.
- The agent identity blueprint presents its credentials to Entra ID while requesting an exchange token (T1).
- Entra ID issues the T1 token.
- Agent identity uses the T1 token and sends it to Entra ID to receive an access token.
- Entra ID validates T1, and if the request is valid, it issues an access token (TR).
- The access token (TR) is used by the agent identity to access the resource.
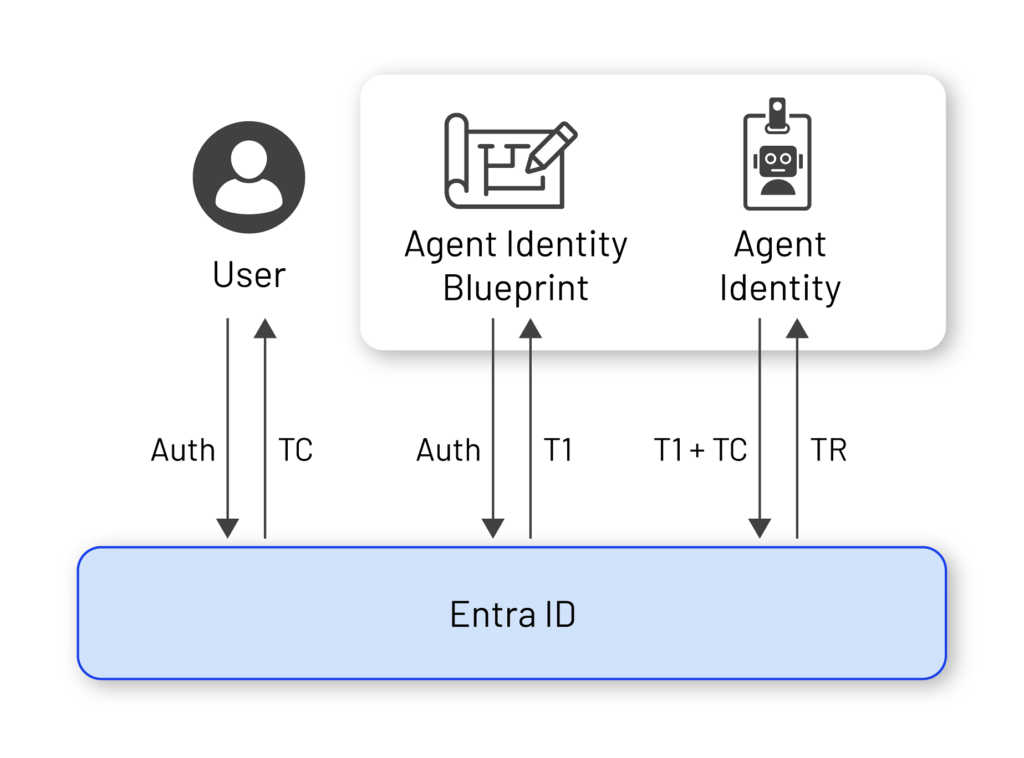
On-Behalf-Of (OBO) authentication
This is a delegated flow used when the agent identity needs to access a resource on behalf of a real human user.
- The user authenticates against Entra ID.
- Entra ID issues an access token for the user (TC).
- The user sends the TC to the agent identity blueprint.
- The agent identity blueprint authenticates against Entra ID.
- Entra ID returns the T1 exchange token.
- Now the agent identity sends T1 + TC to Entra ID.
- Entra ID validates both tokens, and if everything is correct, it returns a resource access token (TR).
- The access token (TR) is used by the agent identity to access the resource.
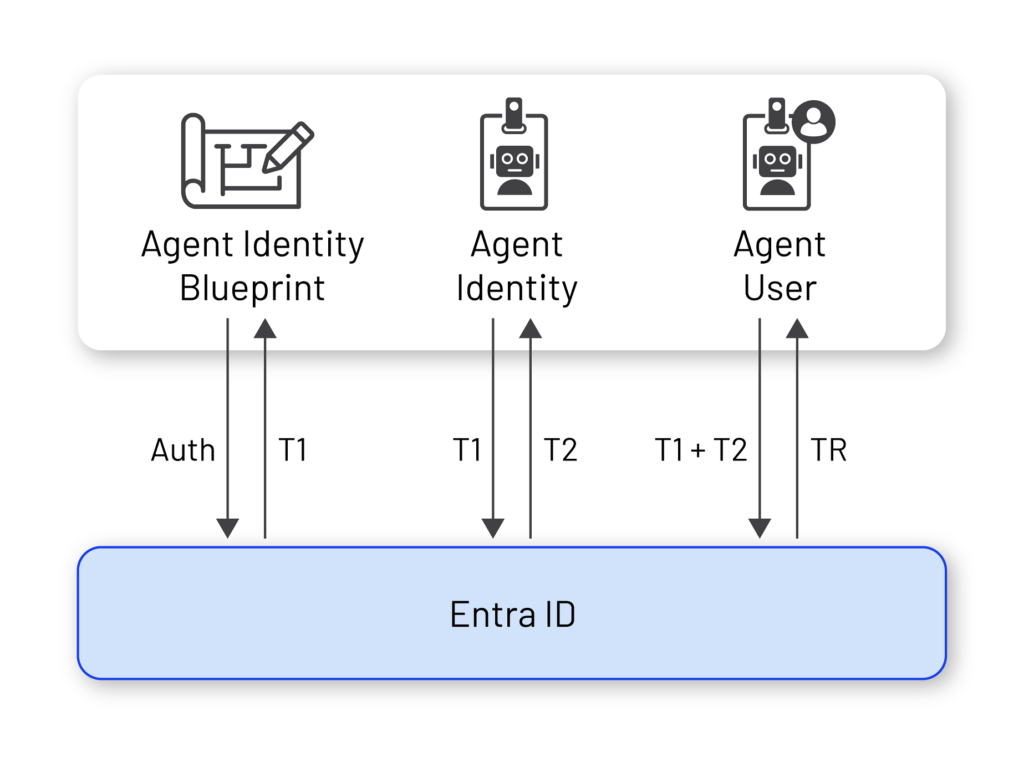
User context (agent user) authentication
This flow is used when the agent user needs to operate with a user context but still acts autonomously.
- The agent identity blueprint authenticates against Entra ID.
- Entra ID returns an exchange token (T1).
- The agent identity requests an exchange token (T2) by sending T1 to Entra ID.
- Entra ID validates T1 and sends back the T2 token.
- The agent identity sends both T1 and T2 to Entra ID.
- Entra ID validates the T2 token, and if everything is correct, it returns the resource token (TR).
- The access token TR is used by the agent identity to access the resource.
Putting it all together
Now, you’re ready to see the authentication happen.
Return to the agent identity you have been working with and follow along in the next practice to understand how these three authentication flows behave.
Walk through Practice Checkpoint 4: Verifying Tokens and Claims Across Three Authentication Flows.
Explore the guide
- Introduction: Understanding and Preventing Entra ID Agent Identity Attacks: A Comprehensive Guide
- Chapter 1: Meet Entra ID Agent Identities (BTW They’re Not People)
- Chapter 2: The Taxonomy of Workload Identities in Entra ID: Enterprise Applications, Service Principals, and Other Forms of Organized Confusion
- Chapter 3: Understanding Microsoft Agent ID and the Agent Identity Platform
- Practice Checkpoint 1: Building Agent ID with MS Graph
- Chapter 4: Agent Identities: Design Deep Dive
- Practice Checkpoint 2: Setting Agent Identity Permissions
- Practice Checkpoint 3: Registering an Agent—With and Without Agent ID
- Practice Checkpoint 4: Verifying Tokens and Claims Across Three Authentication Flows
- Chapter 6: Where Things Might Go Wrong with Agent Identities in Entra ID—and How to Prevent Disaster