This paper emphasizes the significance of default read permissions in Active Directory (AD) security, which is often neglected. The AD forest is not just a security boundary, but it should also be regarded as the range of an intruder’s access and security assessment of AD objects after gaining entry into an organization’s network. Removing specific default read permissions is a low-risk measure that increases the difficulty for intruders to carry out reconnaissance and plan their next steps. Understanding the built-in logic of Microsoft’s protection mechanism for the most privileged accounts in the directory is crucial in comprehending the benefits and drawbacks of this mechanism.
This paper explains how to adjust the protection mechanism by removing risky default read permissions to improve AD safety. Moreover, the paper addresses the issue of misconfiguration debt in most AD infrastructures and how to fix the permissions on objects that were once part of a privileged group but are no longer. Ultimately, securing AD by restricting object visibility and general read permissions is critical in reducing AD’s attack surface and enhancing its security posture.
Restricting Reconnaissance and Lateral Movement
Proper lockdown has a direct impact on how difficult — or easy — it is for intruders to use Active Directory (AD) against you during the reconnaissance phase of an attack.
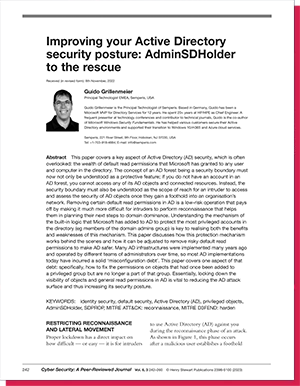
As shown in Figure 1, this phase occurs after a malicious user establishes a foothold in your corporate network, typically by deceiving your employees via phishing e-mails or special malicious websites. By this stage, the intruder typically has taken over the AD account only of a normal authenticated user (ie any unprivileged employee account that does not administer your company’s AD). You may think that an unprivileged user is no threat to your company’s security, but how long will an intruder remain unprivileged? Intruders initially use known vulnerabilities of the operating system (OS) or drivers on insufficiently patched endpoints to elevate their local privileges and thus quickly gain administrative access on the compromised client. This allows them to disable other protections that may exist on the client, download further malware, and establish a command-and- control system usually enabling direct remote access by other gang members. The next goal would be to move laterally to other clients, performing proper reconnaissance with the focus to compromise a domain admin account to eventually gain domain dominance.
Nonetheless, the intruder’s real target is clear: reaching and extracting your sensitive business data to put you under pressure. Better yet, increasing that pressure by encrypting as many systems in your environment as possible, including all servers, their backups and the safety copies of those backups. These actions are then followed by a friendly ransom note, requesting a Bitcoin payment within a few hours or days, and promising that upon payment you will receive a decryption key and your sensitive data will definitely not be released to the highest bidder on the Dark Web. Would you pay? Ideally, you will not need to answer that question. Instead, you will have put your effort into preventing intruders from reaching their goal, taking over your AD and destroying your company. The first step is to make it difficult for any intruder to locate your privileged users and read sensitive data from your AD.
Locking Down AD Can Make the Difference
A ‘lockdown’ of AD usually refers to permission changes in the directory (ie changing some of the default permissions). Unfortunately, these permissions are much too open, giving away too much of the information stored in your AD to the bad guys. Typical users and business apps rarely need this information, so removing some permissions in AD brings you much closer to the general best practice of IT security: the least privilege model, in which you grant users only as many permissions as they need to do their job. For any permission changes in AD, however, you always need to weigh the pros and cons of how those changes could affect your business apps. After all, a perfectly safe AD that fails to support your business apps is no help to you. Ideally, you have a solid test environment that contains not only a test AD forest (configured just like your production AD) but also a copy of the most critical business apps you use. This environment enables you to test the impact of any permission changes in AD before you implement them in production.
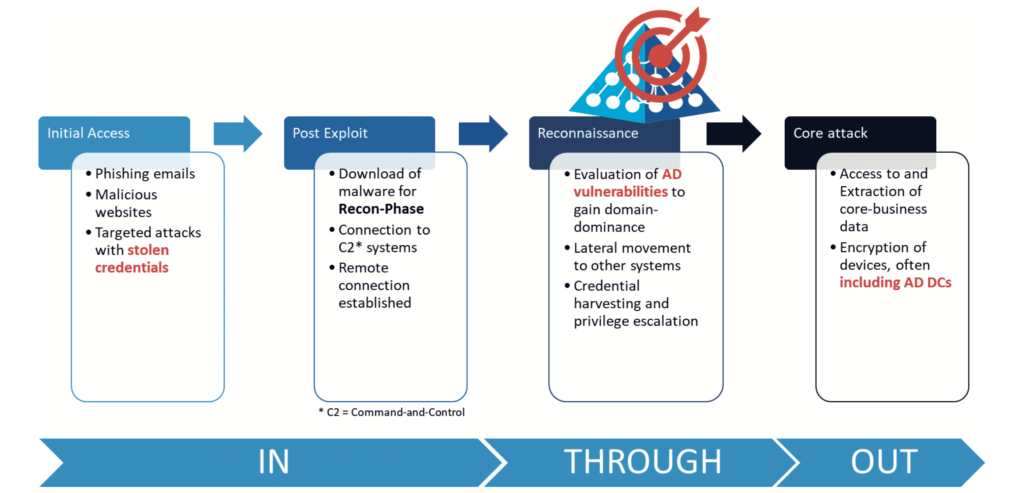
In any case, permission changes must be planned carefully (see Figure 2). The good news is that reverting to the original permissions is fairly easy (for example, if your testing overlooked some artifacts). Documentation of which permissions you are changing in AD is critical to enable you to undo any such changes. A proper AD auditing tool can do this for you, keeping you in a safe spot.
Your Privileged Objects Are A Key Target For Intruders
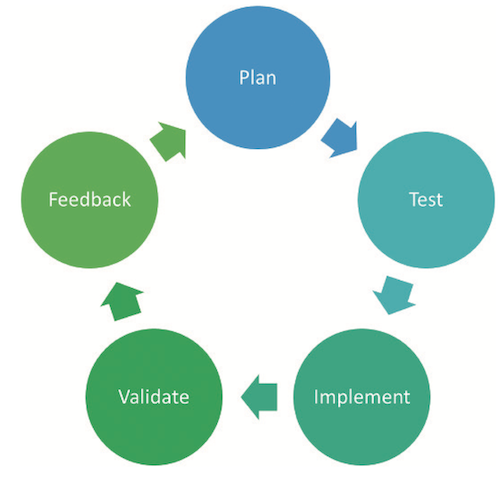
If you must choose a specific area to begin a lockdown of your AD, the first choice should clearly be your privileged accounts and groups. These are your enterprise and domain admins groups and their members, but also those other special groups such as account operators, server operators etc. and their members. In a properly configured AD, none of your business applications will use those privileged groups and accounts. Such apps also do not need to perform a lightweight directory access protocol (LDAP) lookup such as ‘who is a member of the domain admins group’ to work. Therefore, this AD lockdown is typically a low-risk task. AD uses the attribute ‘adminCount’ on objects to flag those that it considers to be ‘privileged’; the corresponding objects have this attribute set to 1. To understand which groups your AD considers privileged, you can run a simple LDAP query with the following filter:1
(&(groupType:1.2.840.113556.1.4.803:= 2147483648)(admincount=1))
This query searches only for security groups, specifically those that are flagged with a ‘1’ in their adminCount attribute. Use your favourite LDAP query method; for example, DSQUERY:
dsquery * domainroot “(&(groupType: 1.2.840.113556.1.4.803:=2147483648) (admincount=1))”
or PowerShell:
Get-ADObject -LDAPfilter “(&(groupType: 1.2.840.113556.1.4.803:=2147483648) (admincount=1))”
or the LDAP filter directly in the AD Users & Computers Microsoft Management Console (MMC), with the custom search/ advanced option (see Figure 3). The results in your domain might be different, especially if you have nested other groups into those default privileged groups, even temporarily. The results also depend on the OS version of your AD domain controllers and how you have upgraded between versions. But ideally, your list does not deviate too much from this default. If it does, you might have some clean-up work (discussed below) ahead of you. First, it is important to understand what the adminCount attribute means and where it comes from, as well as some basics of AD behaviour and design.
Fine-Grained Delegation of Permissions Was A Cornerstone of AD’s Success
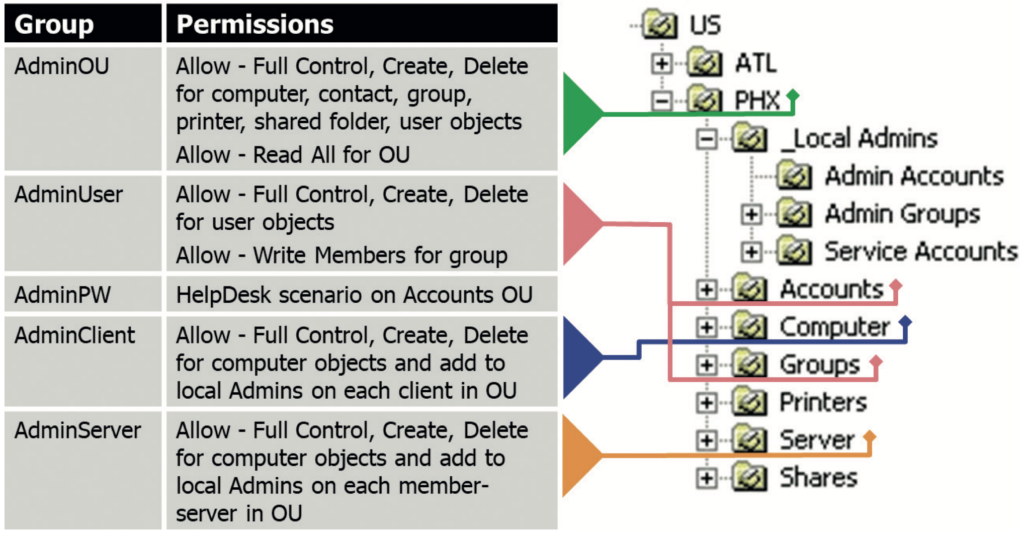
When Microsoft designed AD more than 23 years ago, it added powerful permission delegation capabilities, down to every attribute of the objects in the directory. The basis of this capability was to store separate permissions, called a security descriptor or access control list (ACL), for each object in AD as part of the object itself (stored in the nTSecurityDescriptor attribute). The AD security model supported inheriting permissions down a whole tree of organisational units (OUs) to efficiently configure permissions without setting them separately on all objects. But the model also allowed explicit permissions to be set directly on an object (eg another OU, user or group) (see Figure 4). That object’s explicit permissions could be mixed with the inherited permissions or could block permissions from being inherited from the parent object.
This flexibility enabled even the largest companies to use a central, global IT directory that could delegate important support tasks to other teams. At the time AD was designed, having separate helpdesk teams in every country that a company operated in was common practice. Those teams performed classic support tasks such as resetting the password of a user account in their region, adding computer objects or even adding users to groups as required to run the business. Through permission delegation at the proper OU level (eg OU=PHX,OU=US, DC=mycompany,DC=com) and inheritance of permissions down the whole OU branch to the relevant objects (eg user, computer, group), the members of a corresponding helpdesk AD group could perform all the necessary support tasks for the users, computers and groups in any of the sub- OUs. This ability did not require group members to have permission to administer the AD service itself. In other words, the helpdesk staff was not a member of the domain admins group and could not change the AD configuration, promote new domain controllers (DCs), or log on to AD domain controllers.
Such helpdesk users with specific delegated permissions in AD are referred to as AD data admins, while the truly privileged accounts, such as domain admins, are known as AD service admins. But what if a ‘real’ domain admin account is in a sub-OU to which the helpdesk staff is granted the rights to reset user passwords? Or worse, what if someone does not grant the helpdesk permissions at the proper sub-OU level but instead does so at the domain root? Without an extra protection mechanism in AD to prevent a data admin such as a helpdesk account, from performing any changes (such as resetting the password) on a service admin, such as a domain admin account or any other privileged account or group, the overall security of any AD implementation would be in a dire state. Any delegated helpdesk staff could easily compromise the entire AD.
SDPROP: The Built-In AD Protection Feature
The protection of those privileged AD objects is exactly the job of the Security Descriptor Propagation (SDPROP) process. This process periodically (every 60 minutes by default, or as configured) runs on each primary domain controller emulator (PDCE) of every domain in an AD forest and searches for all privileged objects in the respective AD domain. SDPROP does not just check for memberships in the default groups (such as domain admins) but continues to follow any groups that are nested in those privileged groups and mark them and their members as ‘privileged’. As you can add users, groups and even computer objects to those privileged groups, any such objects are considered during the scan. Important caveat: the objects need to be local to the same domain as the privileged group to be considered by SDPROP, so do not expect the same protection for users added from another domain.
For each privileged object that SDPROP finds, the process compares the nTSecurityDescriptor of the object to a special permission template that is reserved solely for the purpose of protecting those privileged objects. This template grants a variety of permissions, but most importantly ensures that only administrators, domain admins and enterprise admins can change the password of privileged accounts. If the SDPROP process finds a deviation between the permissions on the objects it finds and those in the template, it replaces the nTSecurityDescriptor of the relevant object with that in the template and then updates the adminCount attribute of the object with a ‘1’.
Behind The Scenes: AdminSDHolder
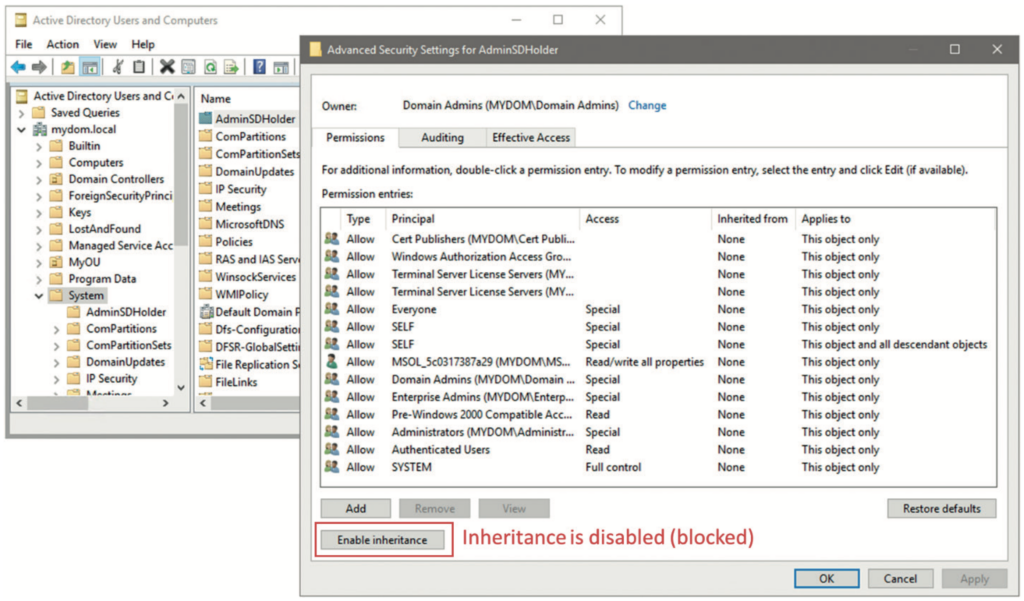
The special permission template that SDPROP copies to your privileged objects is configurable. It is the nTSecurityDescriptor(permissions) from your domain’s AdminSDHolder object. This name should ring a bell: it is literally the ‘admin security descriptor holder’ object, a container object located in each domain’s system container (CN=AdminSDHolder,CN=System,DC=myco mpany,DC=com). The default permissions set on AdminSDHolder are comparatively restrictive with regards to changes on the objects. That is what you would expect from permissions that are going to be stamped on all the privileged groups and users in your AD. The sample list of permissions in Figure 5 is from a recent deployment of a test lab on Windows Server 2019 that does not contain Exchange servers. If you have Exchange in your environment, you will find more permissions added to this template. After all, the Exchange developers had considered ‘owning’ the AD for their application. For now, keep in mind that the following permissions are stamped on all your privileged objects in the respective AD domain. Most importantly, you can see that this access control list (ACL) does not have inheritance enabled. In other words, the ACL blocks the inheritance of the permissions set on a parent object (OU), including those helpdesk-password reset permissions discussed previously. In this way, the combination of SDPROP and AdminSDHolder protects your most privileged accounts from poorly configured permissions in your AD.
Technically, you can remove a few default admin groups in AD from being considered as privileged by the SDPROP process, specifically the account operators, server operators, print operators and backup operators’ groups. The members would then not be overwritten with the permissions from the AdminSDHolder object. Because each group has its own risk with respect to elevation of privileges in AD, however, this configuration is not recommended. These groups are worth protecting, or even better, not used in the first place. To learn more about excluding (or re-including) these groups from the SDPROP process, see the article ‘Active Directory Security: Understanding the AdminSDHolder Object’.2
The Role of the AdminCount Attribute
The adminCount attribute itself does not have any true security relevance. It is a simple support feature that enables you to more easily use an LDAP query to determine which objects’ permissions have been replaced with the permissions set on that special template, as shown earlier. Note that once you remove a user, group, or computer from a privileged group, it will no longer be privileged. The SDPROP process writes the event-id 4780 to the primary domain controller’s (PDC’s) security event-log when stamping the AdminSDHolder permissions on privileged objects and updating those objects with the adminCount attribute (set to 1). It neither reverts those changes once an object is no longer privileged, however, nor does it write any event to the event-log informing you of no longer considering them privileged. For example, when you temporarily add someone to the domain admins group and the SDPROP process runs before you remove the user, that user will still have the locked-down nTSecurityDescriptor setting and be marked with adminCount=1. The same is true for any object. Ideally, then, you should not temporarily add any user to a privileged group. If you have done so, you should clean up the permissions and adminCount attribute so that the user is configured back to its original state. This clean-up process is described later in this paper.
A Closer Look at AdminSDHolder Permissions
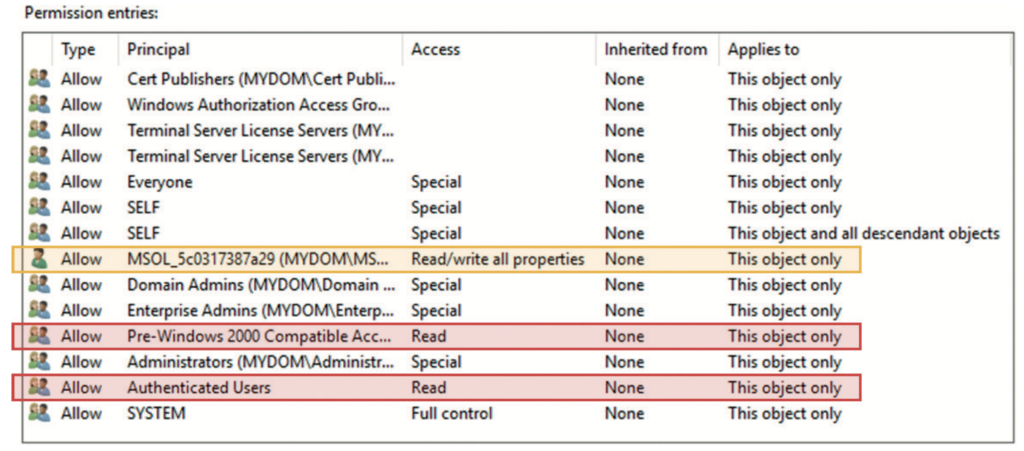
With an understanding of these concepts, are you happy with the permissions that are granted via the AdminSDHolder object and SDPROP to all your privileged accounts? If you have a closer look at those permissions, even without Exchange in the mix, you will notice some questionable permissions, as highlighted in Figure 6, taken from the advanced security settings page of the AdminSDHolder object, which you get to either via AD users and computers or ADSI edit. What access do those other entries marked as ‘special’ grant to the respective security principal in that ACL? Unfortunately, the standard AD security editor does not do the greatest job of properly converting the SDDL string stored in the nTSecurityDescriptor attribute. Even when you open the respective access control entry (ACE), those special permissions are often not displayed. So, you must either find them directly via PowerShell, through something like (Get-Acl‘AD:CN=AdminSDHolder,CN=System,D C=mydom,DC=local’).access, or by using DSACLS.exe, both of which have an output that is tough to decipher. A comparatively easy, powerful, and often overlooked tool for ACL management is LDP.exe, which does a perfect job displaying all ACEs with the relevant information. Follow these steps to fully display the proper permissions of your AdminSDHolder object: Start LDP.exe;
- Choose Connection > Bind (or Ctrl + B) and Bind as the currently logged on user;
- Choose View > Tree (or Ctrl + T) and select your domain as the BaseDN;
- In the domain-tree on the left, navigate to System > AdminSDHolder;
- Right-click the AdminSDHolder object and select Advanced > Security Descriptor;
- Click OK to display the Security Descriptor;
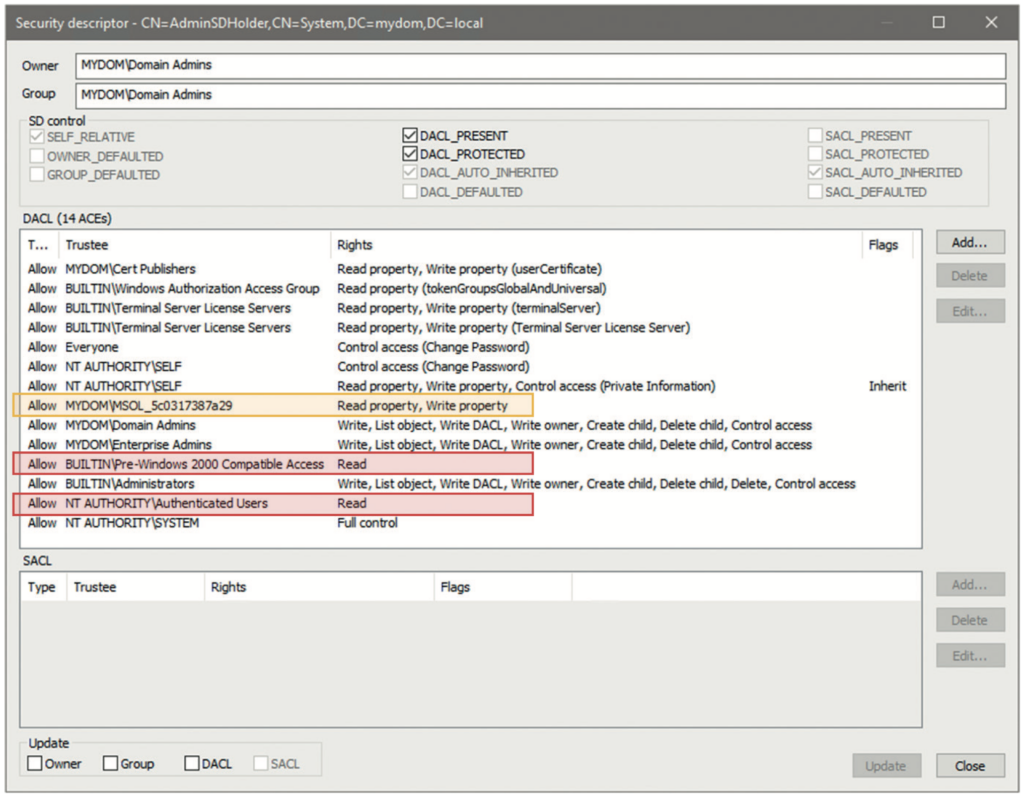
The resulting window should look similar to the one in Figure 7. When you compare this with Figure 6 from the standard security editor, you can see that even the ACEs are sorted in the same order. If you have never updated the AdminSDHolder permissions with the default security editor (as used within AD users and computers and ADSIedit), the LDP.exe security editor even shows you the original pre-Windows 2000 compatible access ACEs, split up for many object types. The default security editor cannot even properly process those ACEs and simply replaces them with a generic read permission on any other update of the ACL; once updated with the default security editor user interface (UI), those other ACEs for this group are automatically removed. This does not happen if the AdminSDHolder (or any other) permission is updated with the LDP.exe security editor, so in general, LDP.exe is the safer option to work with when updating critical ACLs in AD.
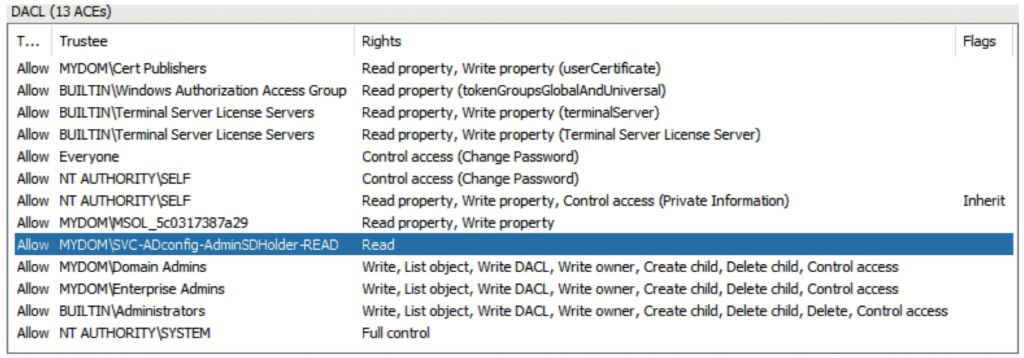
You can now easily confirm that the everyone and self-permissions are of no concern. The change password permission might look dangerous but indicates nothing other than the rights to change the password of a user when you know the old one of that same user (unlike reset password, which allows an administrator to overwrite any existing password). That said, what is the problem with the highlighted ACEs? The MSOL_5c0317387a29 (ie ‘MSOL_’ plus a random string) account, highlighted in orange in Figure 7, is found in most environments. This account is a default account that is created automatically during setup of the Azure AD Connect tool, which uses the account to synchronise objects between on-premises AD and Azure AD. Older versions of Azure AD Connect, when using the express installation option, automatically added the account to the AdminSDHolder ACL to enable control over the privileged groups and users. If you configured your Azure AD Connect account manually or use a newer version of the tool, you might not find this entry.
You should not replicate any privileged AD accounts or groups to Azure AD, as this could lead to additional attack paths between the two directories. If you follow that rule, there is no requirement to keep the sync account permissioned this way, so you might as well remove the entry from AdminSDHolder. The sync account itself, however, must be seen as highly privileged and sensitive, so removing the ACL here does not provide much additional reduction in the AD attack surface. Not so for the two entries highlighted in red: the pre-Windows 2000 compatible access3 and authenticated users groups. Both are granted full read permissions on any privileged object in AD. This is certainly not ideal; any user (or computer) in your AD forest can enumerate the contents of any privileged group (eg Domain Admins) and list the various group memberships of any privileged user. That is exactly how intruders like it: easy to determine who in your AD to go after and which account to capture and use to perform a pass-the-hash or other attack to gain domain and forest dominance. Your users and business apps will most likely never need to look up this information, so why grant it?
The answer is simple: you should not. Remove these two permissions (including all other ACEs that might be assigned to the pre-Windows 2000 compatible access group). Simply replace them with a permission for another group; for example, SVC-ADconfig- AdminSDHolder-READ. Make that group a domain Local group so that you can control its membership when you need a service account or computer object that runs software that has a legitimate right to read data from your privileged objects. Using the domain local group type enables you to add any users, global or universal groups or computers from any domain in your AD forest. You might need this capability for software or systems that you use to monitor or administer your AD. For example, if you run Semperis Directory Services Protector (DSP), you will want to add the DSP computer account to that group. But all other users and computers are cut off from reading anything about your privileged objects, which is an effective way to reduce your AD attack surface. Intruders are simply hindered from enumerating the proper objects. Note that this action needs to be repeated for each domain in your AD forest.
An updated AdminSDHolder template in the root domain would then look like Figure 8. To determine the effect that such changes will have on your AD security posture, you should use the rights that an intruder would have available through a normal domain user both before and after changing the permission on the AdminSDHolder object in your production environment. For the sake of simplicity, this example checks the security of the root domain in an AD forest, ignoring the child domain. In reality, you will want to check the security of all domains in the forest.
Using Powerful AD Vulnerability Scanners
You can easily perform these straightforward checks using free tools: the Purple Knight AD vulnerability scanning tool,4 BloodHound5 and SharpHound (the data- collector tool of BloodHound). Intruders often use a combination of SharpHound in the victim’s network and BloodHound on an external machine to find the shortest attack path to the domain admins group. Both vulnerability scans can easily be repeated in an AD environment, without any special configuration, although getting BloodHound and its dependencies (ie NEOj4 database, Java JDK) working can require substantial effort. Purple Knight requires no installation beyond downloading and unpacking the corresponding .zip file.
Before Adjusting AdminSDHolder
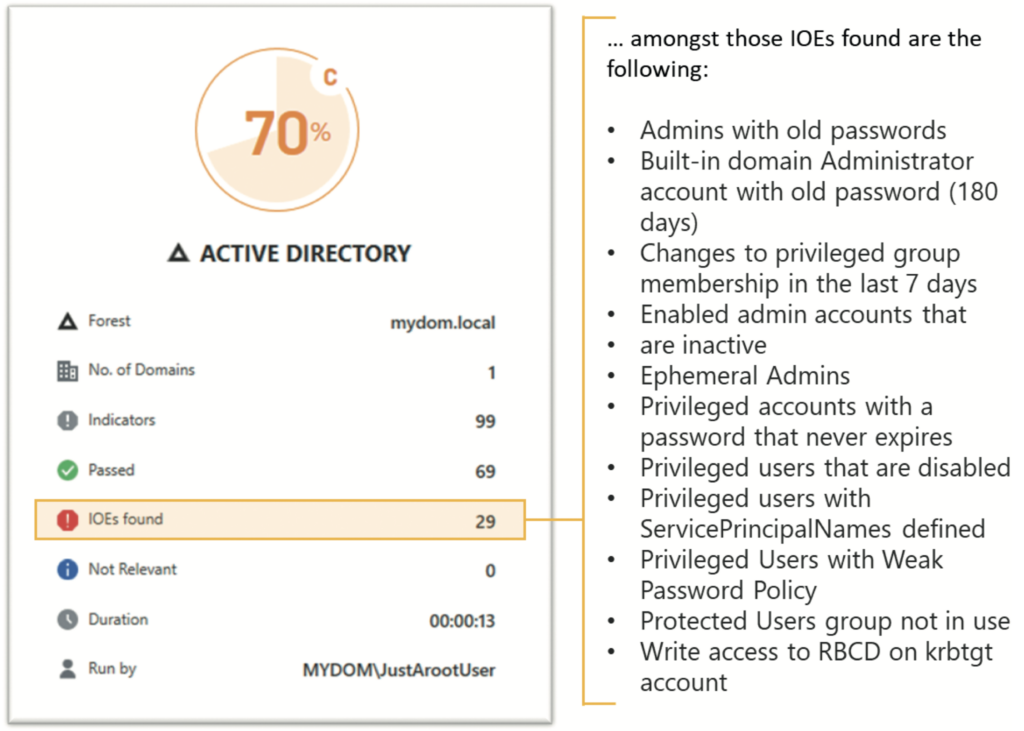
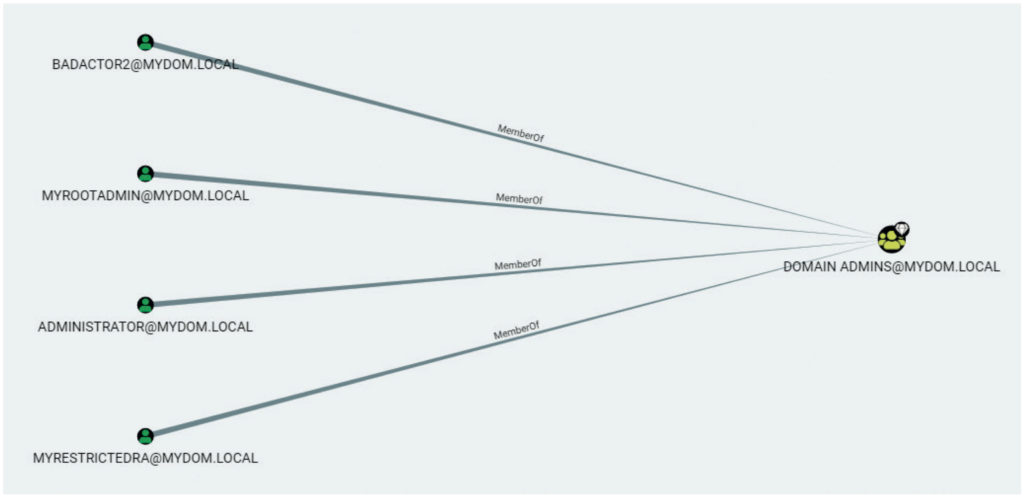
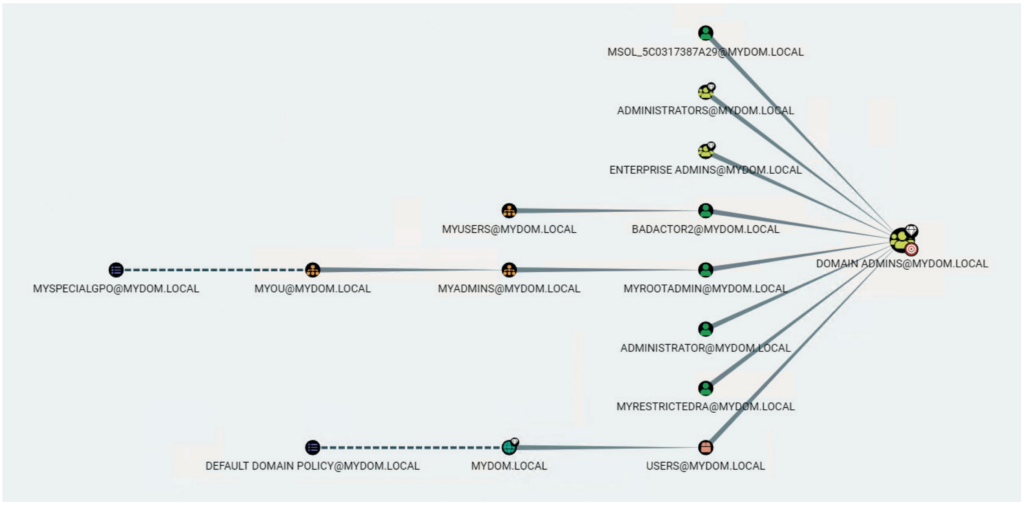
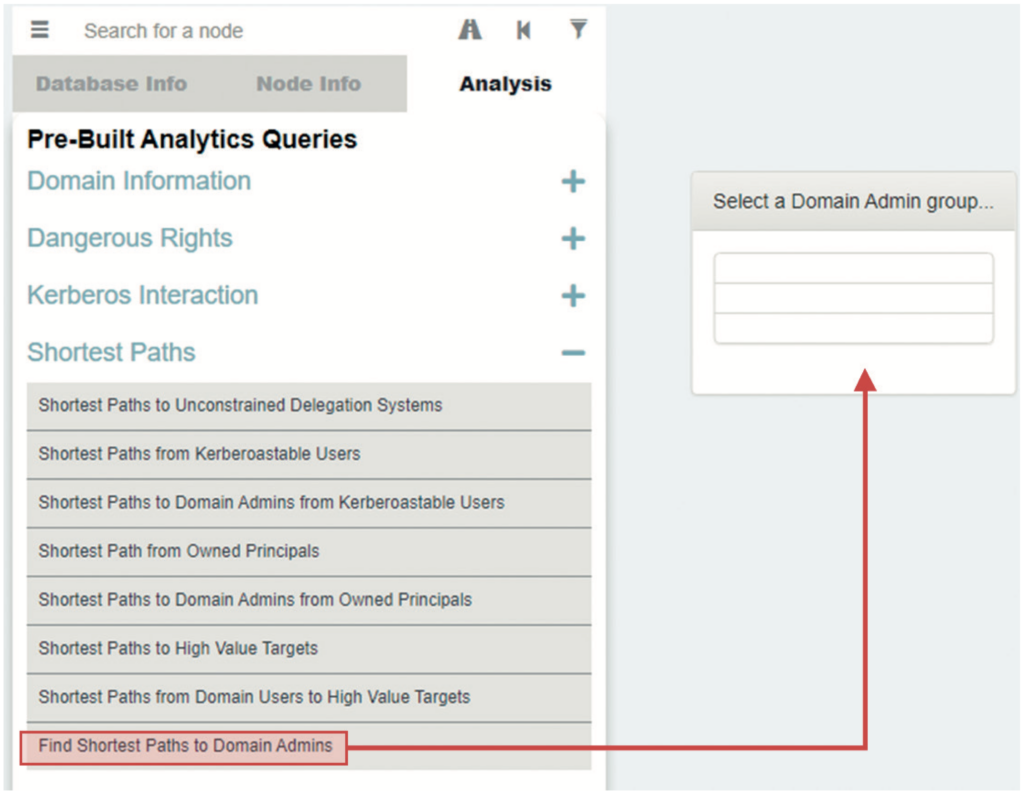
This example performs both scans as a simple user, JustArootUser. This user has no special admin rights in AD but is an authenticated user in the AD forest. This scenario mimics the actions of an intruder in your AD environment. The first scan, using Purple Knight, shows 29 indicators of exposure (IOEs) — vulnerabilities that an intruder could use to attack AD (see Figure 9). The BloodHound/SharpHound scan lists all the domain admin accounts (see Figure 10) that the simple user can access and the shortest path for that user to the domain admins group (see Figure 11).
After Adjusting AdminSDHolder
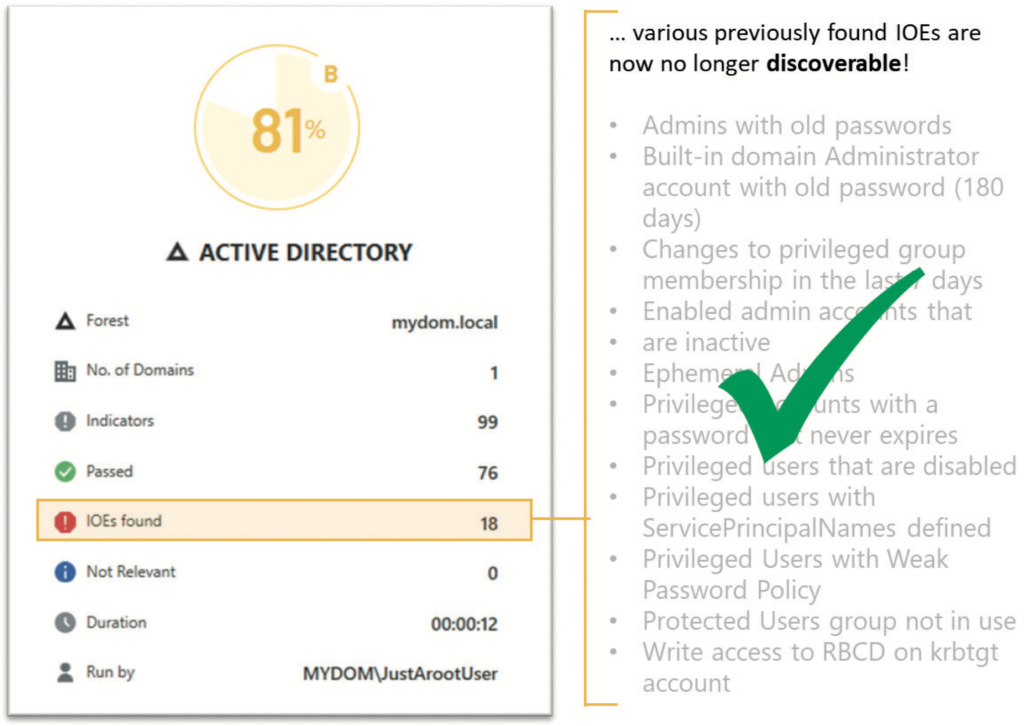
After removing the ACE for the authenticated users and pre-Windows 2000 compatible access groups from the AdminSDHolder in the root domain and adding the ACE for the SVC-ADconfig- AdminSDHolder-READ group, you must wait for the SDPROP process to run and update your privileged objects so that their nTSecurityDescriptor attributes are updated with that of the AdminSDHolder template. This process takes about an hour, but you can manually trigger the update, as described later in the paper. After these actions, a Purple Knight scan finds only 18 IOEs — 11 fewer vulnerabilities than before (see Figure 12). Now that the simple user can no longer enumerate either the domain admins group or its members, a BloodHound/SharpHound scan shows that an intruder would be unable to see members of the group or locate attack paths towards them (see Figures 13 and 14).
Is AD Safe Now?
Note that the vulnerabilities against privileged accounts do not fully disappear; they simply are not easily visible to attackers. But finding the proper weak spots to attack your AD has just become much more difficult. For example, intruders can no longer see which privileged users are properly protected by the protected users group — a group that you want your domain admins and other privileged users to be a member of as the group does what its name implies: protect accounts from various attack vectors, such as pass-the-hash attacks. With the lockdown, intruders can no longer plan out a detailed attack path towards your most privileged accounts and must find other ways to compromise your AD. Those ways are often more complex. If you have proper monitoring of your AD and endpoints in place, such attacks might trigger an earlier alarm for your security operations center (SOC) team. A combination of tools such as Microsoft Defender for Identity, Semperis Directory Services Protector and SentinalOne XDR will get you quite far in this space.
Still, this permission lockdown does not mean that you can let up on other security best practices. You should still be serious about tiering your AD infrastructure. At minimum, this means that your highest privileged accounts never log on to any system other than the domain controllers (or other highly trusted, Tier 0 systems). Hiding access to your privileged accounts is just one aspect of this type of administrative tiering and specifically addresses the reconnaissance techniques used by attackers as described in the MITRE ATT&CK framework.6
Also keep in mind that the Purple Knight scan still detected other potential vulnerabilities, even after lockdown of the AdminSDHolder. IOEs such as ‘Non-default principals with DC Sync rights on the domain’ or ‘Domain trust to a third-party domain without quarantine’, were still found via the standard permissions for authenticated users on other objects in the domain — and could still be used by intruders for attack planning.
You Are Not Finished Yet …
Now that you have created the SVC- ADconfig-AdminSDHolder-READ group, you must still add the proper accounts to the group, which you want to re-enable for reading privileged objects. These accounts include low-privileged service accounts for security and management tools, and in a multi-domain forest, the domain admins of other domains. For example, Figure 15 shows a child domain’s domain admin view of the forest root objects. This account, which relied on the authenticated users permissions in AdminSDHolder, no longer has rights to read the privileged groups of the root domain.
This issue is easily fixed by adding the child domain’s domain admin group (global) to the local SVC-ADconfig- AdminSDHolder-READ group in the root domain. Once you lock down the child domain, you will need to repeat this task to add the root domain’s domain admin group to the child domain group — or you can make the special AdminSDHolder group a universal group in your root-domain, use it on all the AdminSDHolder templates in that forest, and add all domain admin groups to it. Your choice. It should go without saying: do not enable inheritance on the AdminSDHolder template itself. Doing so would invalidate the entire feature. Also note that just as you can use AdminSDHolder to lock down your AD by removing permissions, intruders can also use the object to gain persistence in a compromised AD. To do so, an intruder first creates some inconspicuous user and hides it somewhere in your OU structure. They then assign this user the permission to reset user passwords in the AdminSDHolder template. SDPROP does the rest, enabling the intruder to stay in control. Clearly, you will want to continuously monitor this template for changes. Lastly, as mentioned earlier, you need to clean up those leftover admins and admin groups that you might have generated over the years.
Privileged Objects Clean-Up: Finding Misconfigured Objects
The following steps enable you to locate and clean up objects that were previously considered privileged by AD (and thus ‘stamped’ via SDPROP by updating their ACL and setting the adminCount attribute to ‘1’) but that are no longer members of any privileged groups:
- Mark all existing groups with admincount=1 via the telephoneNumber attribute (or some other unused attribute) so that you can more easily locate these groups again in a later stage of the clean-up: Get-ADObject-LDAPfilter “(&(groupType:1.2.840.113556.1.4.803:= 2147483648)(admincount=1))”| Set-ADObject -Replace @ {telephoneNumber=“adminCount- Check-20220730”};
- Clear the current setting on the adminCount attribute for all previously found groups: Get- ADObject -LDAPfilter “(&(group Type:1.2.840.113556.1.4.803:= 2147483648)(admincount=1))” | Set- ADObject -Clear “adminCount”;
- Ensure that the SDPROP process will restamp all relevant objects: SDPROP will perform an update only on relevant objects when a change occurs on the ACL on either the target or AdminSDHolder. The easiest way to ensure that SDPROP will perform its magic is by manually adding a bogus ACE (eg Allow ‘Backup Operators’ to ‘List Object’) into AdminSDHolder, then remove the ACE after your check;
- Force SDPROP to execute.
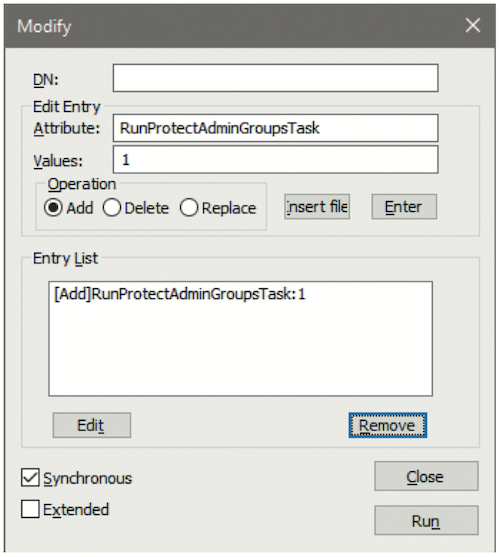
You can wait up to 60 minutes for the SDPROP process to run (ie wait for the default schedule to trigger the operation). Or you can force the DC with the PDCE FSMO role to start the SDPROP process on your command, by sending the RunProtectAdminGroupsTask command to the RootDSE of your domain. The easiest method is to use LDP.exe as a user with domain admin privileges: choosing the ‘run as administrator’ option when launching it, then:
- Launch LDP.exe, choosing the Run as administrator option;
- Select Connection > Connect and enter the DC with PDC emulator role in your domain;
- Press Ctrl + B or select Connection > Bind to Bind as the currently logged on user;
- Press Ctrl + M or select Browse > Modify to start a Modify operation;
- Leave DN: blank and enter RunProtectAdminGroupsTask as Attribute and 1 as Value;
- Choose Operation ADD and then click Enter or press Alt + E;
- When you see the entry [Add] RunProtectAdminGroupsTask:1 in the Entry List of the Modify window (see Figure 16), click the Run button to run the operation and execute the SDPROP process.
- Wait for the SDPROP process to finish processing. You can either check that
the adminCount=1 attribute returns to the known objects you expect (eg the direct members of your domain admins group) or check your security event log on the PDCE and validate that no more events with ID 4780 (task category: user account management) are generated. Those events show you which objects have been reset via the SDPROP process. - Check which groups have not been updated by using the previous flag and adding a filter for those groups, where adminCount is not set to ‘1’: Get- ADObject-LDAPfilter “(&(groupType: 1.2.840.113556.1.4.803:=2147483648)(telephoneNumber=adminCount-Check-20220730)(!(adminCount=1)))”;
- The result from the last filter are the objects that you will want to concentrate on cleaning up soon. They still contain the ACL from the AdminSDHolder setting at the time they were a privileged group, which also means that they do not inherit any permissions that you might have set at the OU level;
- Repeat the same procedure with your computer and user-accounts. You likely do not want to use the telephoneNumber attribute as your temporary AdminSDHolder-check-flag on the user objects; perhaps facsimileTelephoneNumber is no longer being used. The proper LDAP filter for finding the privileged users would be: (&(objectClass=user) (objectCategory=person) (admincount=1));
- Remove the bogus ACE from the AdminSDHolder object after you determine your clean-up objects.
Privileged Objects Clean-Up: Resetting the ACLs on Misconfigured Objects
Using PowerShell to restore ACLs on the relevant objects is a bit trickier. There is no simple PowerShell equivalent to the ‘restore defaults’ option that is available in the advanced security settings UI on AD objects. Those defaults are stored in the AD schema, specifically on the defaultSecurityDescriptor attribute of the relevant object class. When you click the restore defaults option in the security UI, the proper class permissions are read from the schema and then applied back on the object. If you have only a few misconfigured objects, this method might be the easiest way to fix them. But what if you have many such objects in multiple locations?
One option is to use the DSACLS tool with the /resetDefaultDACL option, which restores the security of the object to its default as defined in the schema; however, mixing PowerShell and CLI tools can be tricky. And although Microsoft has not created a PowerShell equivalent to process a direct ACL reset to its default, you can use the Get-ACL cmdlet to grab the ACL from another object of the same class, then stamp that ACL on misconfigured objects via the Set-ACL cmdlet. Basically, you can copy and paste ACLs from one object to another via the PowerShell Get-ACL and Set-ACL commands. Because the defaultSecurityDescriptor from the schema is also read and used at the creation of any new object of a specific class, you can just create a dummy object for the purpose of copying the ACL. The object can even be a disabled object since its state is not part of the ACL.
Unfortunately, you cannot just pipe the output of the Get-ADObject cmdlet into the Set-ACL cmdlet, as the latter must receive the object path in a specific format: the object’s distinguished name (DN) preceded with ‘AD:’. Therefore, you must loop through the list of objects returned from Get-ADObject, form the proper path for use with Set-ACL, and then execute the respective command in the loop. The following PowerShell script will reset the ACLs of user-class objects to those of a newly created dummy account called DefaultUserACL. (The facsimileTelephoneNumber attribute was previously flagged to help locate the misconfigured accounts.)
#Set path for ACLing to AD
Set-Location AD:
#Grab ACL objects from a sample user- account (e.g. newly created account)
$DefaultAcl = (Get-Acl “AD:CN= DefaultUserACL,OU=MyOU,DC=mydo m,DC=local”)
#query for the old AdminCount objects that must get their permissions reset $OldAdminCountObjects =
Get-ADObject -LDAPfilter
“(&(objectClass=user)
(objectCategory=person)(facsimile TelephoneNumber=adminCount- Check-20220730)(!(adminCount=1)))”
#work through every object, grab the DN, create the proper ACL-DN-Path and set sample ACL on object
ForEach ($Object in $$OldAdminCountObjects)
{
$ACLpath = “AD:” + $Object. distinguishedName
write-host “Resetting permissions on”,
$ACLpath
Set-Acl -Path $ACLpath -AclObject
$DefaultAcl#update flag of object
Set-ADObject -Identity $Object.
distinguishedName -Replace
@{facsimileTelephoneNumber=“ACL was reset 20220730”}
}
When adapting the script for groups or computers, be sure to change to the proper LDAP filter with the attribute you chose to help you locate those objects. If you prefer, you could skip the creation of those dummy objects and use the same loop-logic to run the DSACLS tools, using the distinguished name of the object and the /resetDefaultDACL option. Either method will help you properly clean up old, privileged objects in your AD.
AD Security Requires Ongoing Attention
This paper was intended to help you understand the benefits of the built-in AdminSDHolder and SDPROP security feature of AD, which protect your most privileged objects within your AD, and how you can lock down those objects even more for improved protection, with the intention of combating the reconnaissance phase of an attack. The harder you make it for intruders to get to your most privileged objects, the better. As described, this hardening method should be accompanied by proper tiering of your administrative accounts and active monitoring of your AD and your endpoints. Securing your AD has always been important, and the continuous rise of ransomware attacks emphasises this necessity.
Resources
1. Mueller, R. and Geelen, P. (September 2020 [November 2011]), ‘Active Directory: LDAP Syntax Filters’, Microsoft, available at https://social.technet. microsoft.com/wiki/contents/articles/5392.active- directory-ldap-syntax-filters.aspx (accessed 25th September, 2022).
2. Smith, R. (January 2018), ‘Active Directory Security: Understanding the AdminSDHolder Object’, Petri, available at https://petri.com/ active-directory-security-understanding- AdminSDHolder-object (accessed 25th September, 2022).
3. Grillenmeier, G. (November 2021), ‘Understanding the Risks of Pre-Windows 2000 Compatibility Settings in Windows 2022’, Semperis, available at https://www.semperis.com/blog/security-risks- pre-windows-2000-compatibility-windows-2022/ (accessed 25th September, 2022).
4. Purple Knight, ‘Uncover Active Directory vulnerabilities before attackers do’, available at https://www.semperis.com/purple-knight (accessed 25th September, 2022).
5. GitHub, ‘BloodHound 4.2.0 – Azure Refactor’, available at https://github.com/BloodHoundAD (accessed 25th September, 2022).
6. MITRE ATT&CK, ‘Reconnaissance’, available at https://attack.mitre.org/tactics/TA0043 (accessed 25th September, 2022).